
 Home
Home
»
Carpool
»
Contact Info
»
Debrief
»
Fleet Info
»
Links
»
Logistics
»
Marks & Courses
»
Photos & Videos
»
Procedures
»
Results
»
Rules
»
Sitemap
»
|
Procedures
Grinders
The grinders work in the cockpit. Their primary responsibility is to trim the jib and the spinnaker. They are called “grinders”
because they grind the winches in the cockpit in order to trim the jib and the spinnaker to their optimal positions.
There are two grinders on Northern Light. The procedures below describe one good way to divide the work between the two grinders,
but if you have ideas about different ways to handle the work so that it can be carried out more quickly and with fewer chances of mistakes,
please speak up!
If you're not familiar with some of the terms or concepts on this page, look them up in the Glossary and
review the Sailing Basics page.
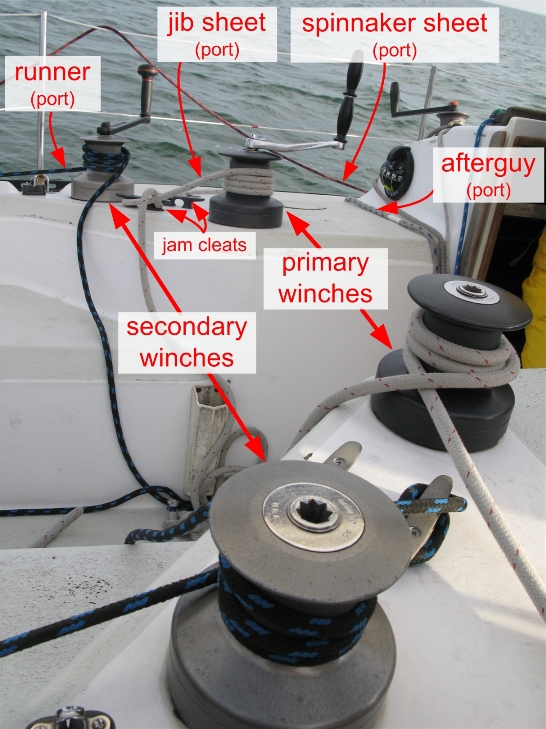
Figure 1: Cockpit
At the Dock
Double-check the rigging for the SPINNAKER SHEETS and the AFTERGUYS:
- Each spinnaker sheet should be rigged outside the lifelines, through the turning block near the stern, and coiled on top of a lazarette
cover at the stern.
- Each afterguy should be rigged outside the lifelines, through the snatch block on the rail near the middle of the boat, UNDER the
spinnaker sheet, and down through the companionway.
- There should be a Siberian hitch knot in each spinnaker sheet and afterguy near the block that each line runs through. This prevents
the lines from dragging through the water and possibly getting caught in the propeller.
Double-check the rigging for the JIB SHEETS:
- The car blocks (fairleads) should be:
- for the # 95 jib: on the forward track and aligned with the shrouds
- for the # 130 jib: on the rear track and aligned with the forward end of the aft cabin window
- note: once we're under sail, here's how to test whether the car blocks are at the correct position:
- As the boat heads up, all 3 telltales near the jib luff should break at the same time.
- If the upper telltale breaks first, move the car block forward (toward the bow).
- If the lower telltale breaks first, move the car block back (toward the stern).
- Each jib sheet should run on top of the spinnaker pole, in front of the topping lift, inside or outside the shrouds (inside the shrouds
for the # 95 jib; outside the shrouds for the # 130 jib), through a car block, UNDER the afterguy, through the turning block near the primary
winch, and down through the companionway.
- Make sure that the jib sheets are routed through the turning blocks in the correct orientation.
- There should be a stopper knot (e.g., a double overhand knot) at the end of each jib sheet. This prevents the jib sheets from running
out of the blocks if the jib starts flopping around.
Coordinate with the crew:
- Grinder # 1:
- Skirts: Remind this person to watch the foot of the jib at the start, on every tack, and when
we round the leeward mark – the grinders should not have to stop grinding when they're bringing the jib in.
- Navigator: Remind this person to tell you the waypoint number of the race committee (RC)
boat when they enter a new waypoint to mark its location. (Note that the RC boat will probably be the last waypoint entered, i.e.,
the highest waypoint #.)
- Lazy and working jib sheet pullers: Remind these people to pull the
jib sheets on every tack, and to give loud instructions if they see the jib sheets caught on anything. The working jib sheet puller in
particular must put their whole body into this job! The quicker the jib moves over, the faster the boat can complete its tack
and power back up.
- Boom pusher (or crew member with few assignments): Tell this person that you may need them to help you
grind when flying the spinnaker.
- The boom pusher is usually a good choice: If the wind is heavy, grinder # 1 needs to grind to bring in the spinnaker, and
the boom pusher does not need to push out the boom. Conversely, if the wind is light, the boom pusher needs to push out the boom,
but grinder # 1 does not need help bringing in the spinnaker. (Note that it's better for grinder # 1 to grind himself, but
it's good to have an option.)
- Mainsheet trimmer: Remind this person to coil the spinnaker sheets before a floater/Mexican
douse.
- Talk to grinder # 2:
- Run through the procedures for tacking, hoisting the spinnaker, jibing, and dousing (floater, Mexican, and
stretch-foot douses).
- Remind grinder # 2: Every time Rod asks "Is everybody ready?", report to grinder # 1.
- Grinder # 2:
- Console: Remind the crew member on console to lock/unlock the topping lift only when the deck crew asks
her to do so.
- Nancie is usually on console. Her job is to lock and unlock the topping lift during the spinnaker hoist and the spinnaker jibe.
Another crew member actually pulls/releases the topping lift at the mast; all Nancie does is lock, unlock, and tension the topping
lift at the console. Grinder # 2 must watch what Nancie does carefully, and remind her not to do anything proactively – she
must wait for instructions from the deck crew.
- Grinder # 2 must handle the topping lift prior to a douse – Nancie cannot handle the topping lift at that time,
as she is below deck preparing to receive the spinnaker.
- If there are very few crew members (e.g., 6 people), there may not be a person to work the topping lift at the mast. In this case,
grinder # 2 must handle the topping lift from the cockpit. Nancie cannot help in this situation because she does not have the strength
to raise and lower the topping lift by herself. It is especially difficult to raise the pole from the cockpit, so ask the foredeck
crew to physically push the pole up before the spinnaker hoist and during a spinnaker jibe.
- Afterguy tailer: Remind this person when you want them to tail the afterguy.
- Talk to grinder # 1:
- Run through the procedures for tacking, hoisting the spinnaker, jibing, and dousing (floater, Mexican, and stretch-foot
douses).
- Also remember: Every time Rod asks "Is everybody ready?", report to grinder # 1 whether you're ready or not.
Miscellaneous:
- Grinder # 1:
- Take care of 3 electronic items:
- Handheld VHF radio:
- Turn on the radio and make sure that the battery is charged and that the channel is set to 78.
- Put the radio in the side pocket of my backpack so it's easy for Nancie to hand the radio to me.
- GoPro camera:
- Hero2 HD: delete the files on the memory card; mount the camera on the pole at the stern.
- Hero: Put in fresh batteries; delete the files on the memory card; mount the camera on the boom?
- Start a video after we leave the dock.
- GPS watch: Put the watch in training mode to acquire a GPS signal and sync the clock.
Then put the watch back in time mode.
- Ping Rod at 5:30.
At the Start of the Race
Before the race we typically sail on a reach. Tacks are from reach to reach, which means that the grinders do not need to bring the jib in
hard-and-fast. Keep the cockpit as clean as possible and listen to the commands of the skipper.
Shortly before the first shape:
- Grinder # 1:
- Start 3 electronic items:
- Handheld radio: Clip the radio to one of the winch handle holders and start monitoring
channel 78.
- GoPro camera: Make sure the camera is recording.
- GPS watch: Start the timer to record our track:
training → START (= upper button) → lap screen → lock bezel → LAP (= lower button) on first shape.
One minute before the start of the race:
- Trim the jib for maximum speed (see trimming the jib below). Both telltales should
be flying back smoothly. Grinder # 1 stays on the rail and eases the jib sheet out; grinder # 2 stays in the cockpit and grinds the jib sheet
in.
- Grinder # 1:
- After the last tack or jibe, put on the runner.
- Remind the crew member handling skirts to take care of the skirt as we head up and cross the
start line.
- Grinder # 2:
- Check the mainsail:
- Put on the cunningham.
- Make sure the outhaul flattener is on.
- Make sure the boom vang is off.
- As we approach the start line, we may need to slow down to kill some time. Listen for these commands:
- slow speed: ease out the jib so that our speed goes down to about 50%.
- kill speed: blow the jib sheet completely, but be prepared to bring it back in quickly.
Ten to twenty seconds seconds before the start signal:
- Grinder # 2:
- As Rod turns the boat and starts heading up, grind in the jib for a close haul (see
trimming the jib below).
- After the mainsail is in the close haul position and fully adjusted (e.g., the outhaul flattener is on), check the luff. Put on the
cunningham just enough to get rid of the wrinkles in the luff.
- Clean up the cockpit and prepare for a tack:
- The working jib sheet should be clean and ready to blow. Coil the jib sheet cleanly and put it on the floor adjacent to the
companionway.
- The lazy jib sheet and the lazy runner should be wrapped around the winches and tensioned.
- Climb up on the rail as soon as possible.
- Grinder # 1:
- Tail for grinder # 2 as we head up to close-hauled.
- After the start of the race, turn off the radio and put it back down in the cabin.
Tips:
- If something unusual happens near the start line (e.g., we need to duck boats, do multiple tacks/jibes, or re-cross the start line),
look up at the Windex and trim the jib for the appropriate point of sail. Let the jib in or out as the boat turns – it's critical
to get the boat back up to speed as quickly as possible.
- If we switch jibs, double-check that the car blocks are on the correct track (forward track for the # 95 jib; rear track for the # 130
jib), and that the jib sheets are routed correctly (on top of the pole and inside/outside the shrouds).
Sailing to Weather
Trimming the Jib
If sailing close-hauled:
- Bring in the jib to its proper position:
- # 95: the jib should be almost as far in as it can go
- the clew should be ~ 6 inches from the car block
- the leech should have a very slight curve (if the leech is straight, the jib is over-trimmed)
- # 130: the leech should be ~ 2 inches inside the end of the spreader, almost touching the shrouds
- if the leech is pressed against the shrouds, the jib is over-trimmed
- Cleat off the jib sheet.
- Wrap the jib sheet clockwise around the winch as you bring the tail end toward the cleat.
- The cleat is a pressure cleat – just jam the line in, far side first.
- Sit on the high rail with your weight out as far as possible.
- Pay attention to the wind strength:
- If the wind dies down, the jib will be over-trimmed – ease out the jib sheet a little bit.
- If the wind picks up, the jib will be under-trimmed – bring in the jib sheet a little bit.
If not sailing close-hauled:
- The grinders need to work together to trim the jib:
- Grinder # 1 stays on the rail and eases the jib sheet out.
- Grinder # 2 stays in the cockpit and grinds the jib sheet in.
- Trim the jib like the spinnaker: play with the jib, constantly letting it out and bringing it back in,
to get the telltales flowing backwards. The wind shifts constantly, oscillating between headers and lifts, so you can't
set the jib in one position and leave it there – you need to adjust the jib continually.
- Grinder # 2:
- Kneel down in the cockpit and grind in the jib sheet when grinder # 1 asks you to do so.
- Call out the heel angle periodically, e.g. “heel 15.”
- Grinder # 1:
- Stay on the rail and hold the tail end of the jib sheet.
- Look at the telltales on the jib constantly. The goal is to trim the jib so that both telltales are flying
back smoothly.
- See Figure 2 below – the green telltale is on the starboard side and the red telltale is on the port side.
- If the windward telltale starts flying up, bring the jib in – ask grinder # 2 to grind.
- If the leeward telltale starts flying up, let the jib out – just ease out the jib sheet.
- For example, in Figure 2 below, the windward (starboard) telltale is breaking, which means the wind is not flowing smoothly on the
windward side of the jib. The grinders should trim in the jib until the windward (starboard) telltale flows back smoothly.
- Call out what you're doing (“bringing the jib in”/“letting the jib out”)
to let the mainsheet trimmer know that he may need to adjust the main.
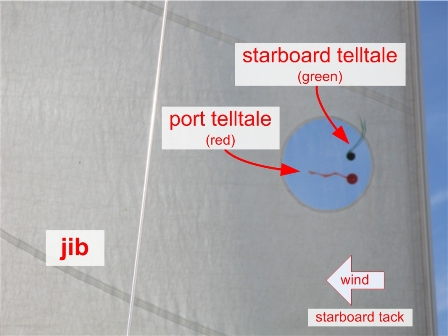
Figure 2: Jib Telltales
Additional controls:
- If the wind is mugh lighter or stronger than normal, use the controls below to change the shape of the jib.
| |
light wind
< 15 mph |
medium wind
15-20 mph |
strong wind
> 20 mph |
optimal
sail shape |
belly |
big |
medium |
flat |
| leech |
open
leech 2" off regular position |
closed (leech at regular position)
- # 95: leech has slight curve
- # 130: leech barely touching shrouds
|
closed |
| control |
car block |
1 length forward |
regular position
- # 95: at shrouds
- # 130: at forward end of aft cabin window
|
1 length back |
| jib sheet |
eased out
leech 2" off regular position |
tight (all the way in)
leech at regular position |
tight (all the way in) |
| runner |
loose |
regular |
tight |
| jib halyard |
loose |
regular |
tight |
- Adjust the jib leech line and foot line as necessary:
- If the jib is trimmed correctly (the telltales are flying back smoothly), but the leech or the foot is fluttering, tighten the leech
line or the foot line.
- Tighten the lines by tensioning them JUST to the point the leech or foot stops fluttering. Do not over-tension the lines as that will
cause the jib to have an inefficient shape.
- Jam the lines in the cleats tightly. On the # 130 jib, the leech line cleat in particular does not hold well.
Tips for trimming the jib:
- Look at the Windex to confirm the wind direction and point of sail.
- In light wind, grinder # 1 can stay in the cockpit instead of climbing up on the rail, and play the jib.
- Don't overtrim the jib – this stalls the sail and reduces boat speed.
- Work on feeling the wind and the boat speed; this will really help you find the correct trim.
- When you go down into the cockpit to adjust the jib or do other work, take a quick look to see if there are any
boats on the leeward side where the driver can't see (in the 10-12 o'clock or 12-2 o'clock positions). Report any boats to the
driver.
- When we bear away to miss a boat or a mark, let out the jib – this affects the driver's ability to
steer around the obstacle. Bring the jib back in as we head up.
- If we do a jib peel (put up a new jib while a jib is already raised), take the stopper knots out of
the jib sheets. This helps the foredeck crew re-route the jib sheets through the car blocks more quickly.
Tacking
Before the tack:
- Grinders are sitting on the high (windward) rail.
- The working jib sheet is on the low (leeward) rail.
- The working runner is on the high (windward) rail.
Skipper gives the command: Grinders Get Ready
- Grinder # 1:
- Climb down into the cockpit and do a triangular sweep to prepare the lazy jib sheet, the lazy runner, and the working jib sheet.
Mnemonic: high tension – low tension – under tension.
- Move the winch handle from the leeward (low) primary winch to the windward (high) winch.
- Check that the lazy jib sheet on the windward (high) side is ready to be trimmed in quickly.
The lazy jib sheet should be wrapped 3 times around the winch, and tensioned.
- Check that the lazy runner on the leeward (low) side is ready to be trimmed in quickly. The
lazy runner should be wrapped 3 times around the secondary winch, and tensioned. Check that there's a winch handle in the winch.
- Get ready to blow the working jib sheet on the leeward (low) side. Make sure the working jib sheet
is untangled and will run free as soon as it's released. Coil the jib sheet cleanly and put it on the floor adjacent to the
companionway. Make sure you're not stepping on the line.
- Uncleat the working jib sheet and hold it in your hand.
- Tell the skipper: “COCKPIT'S READY.”
- Grinder # 2:
- Stay on the rail, but turn around so that your back is to the lifelines.
- Uncleat the working runner and hold it in your hand. You will blow the runner as soon as the skipper
gives the command “Ready About.”
- Report to grinder # 1 that you're ready.
Skipper gives the command: Ready About
- Grinder # 2:
- When the skipper says “Ready About,” blow the working runner.
- Climb down into the cockpit, take the tail of the lazy jib sheet in your hand, cross the boat, and sit
near the rail with your back to the lifelines.
- Tension the lazy jib sheet – pull it in as far as it will go.
- Watch grinder # 1 – get ready to bring in the lazy jib sheet as fast as possible when grinder # 1 blows the
working jib sheet.
- Tip:
- Tune in to how long it takes you to cross the boat and get situated on the opposite rail. As you get comfortable doing this,
you may be able to wait a few more seconds before you climb down into the cockpit – e.g., you may be able to wait until Rod
gets to “3“ or “2” in his countdown. The longer you can stay on the windward rail,
the longer we maintain our boat speed. Ideally you should cross the boat after Rod starts to turn, when the boat is flat.
You do have some time to cross the boat and get situated: Grinder # 1 waits for a couple of seconds after the jib is back-winded
before he blows the jib sheet that you have to pull in.
Skipper gives the command: 5–4–3–2–1, Hard-A-Lee
- Grinder # 1:
- Stay low – watch out for the boom coming across the cockpit.
- Wait for the jib to be back-winded. Then wait a couple of more seconds, and blow the jib sheet.
Tell grinder # 2 to “GO!” so he starts bringing in the new working jib sheet.
- Make sure the old jib sheet is completely off the winch.
- Put the old jib sheet in front of the primary winch, and make sure it's running free.
- Grind the new working jib sheet as fast as possible.
- Go CLOCKWISE first (high speed), then counter-clockwise (low speed).
- The quicker you grind the jib sheet in, the easier it is (because the jib is not under full power).
- If the jib gets caught on a stanchion (outside the lifelines):
- Try hitting the lifeline on the leeward side to get the jib to pop over the stanchion.
- Or yell “Skirt” to the foredeck crew, so they can pull the jib over the stanchion.
- Grind until the jib is at the proper trim:
- on a close haul:
- # 95: the jib should be almost as far in as it can go:
- the clew should be ~ 6 inches from the car block
- the leech should have a very slight curve (if the leech is straight, the jib is over-trimmed)
- # 130: the leech should be ~ 2 inches inside the end of the spreader, almost touching the shrouds
- if the leech is pressed against the shrouds, the jib is over-trimmed
- on a reach: the telltales should be flying back smoothly (see description above)
- When the jib is at the desired trim:
- Grab the tail from grinder # 2, and tell grinder # 2: “GET THE RUNNER.”
- Give a winch handle to grinder # 2 if he doesn't already have one.
- Cleat off the jib sheet. The cleat is a pressure cleat – just jam the line in, far side first.
- Clean up the lines in the cockpit – do a rectangular sweep, starting with the leeward winches:
- Working jib sheet: Coil the line and put it on the floor in the very front part of the cockpit. Make sure the line has a
stopper knot at the end.
- Lazy runner: Tension the line, wrap it around the winch 3 times, and put the tail end through the porthole into the cabin
below.
- Working runner: Put the tail end of the runner through the porthole into the cabin below.
- Lazy jib sheet: Tension the line, wrap it around the winch 3 times so it's ready to go on the next tack, and put the line on
the floor in the rear part of the cockpit. Make sure the line has a stopper knot at the end.
- Winch handles: Leave both winch handles in the leeward winches. This makes it easier to get into the cockpit, quicker to adjust
the jib trim, and set up for the runner on the next tack.
- Before going up on the rail, take a quick look to see if there are any boats on the leeward side where the driver can't see
(in the 10-12 o'clock or 12-2 o'clock positions). Report any boats to the driver.
- If sailing close-hauled: Sit on the high rail and get your weight out as far as possible.
- If not sailing close-hauled: Sit on the rail and work with grinder # 2 to trim the jib.
- Grinder # 2:
- Watch grinder # 1 – when he blows the jib sheet and says “Go!”, pull in the new working
jib sheet by hand, as fast as possible.
- Use long arm motions the quicker you pull in the jib sheet, the easier it is (because the jib is not under full power).
- Be sure not to get an override on the winch.
- Pull the jib sheet slightly up (toward the sky) to minimize the chance of an override.
- If you get an override repeatedly, try using fewer wraps around the winch.
- Note: May need to modify these procedures for the # 150 jib. The # 150 is a really large sail (the clews come back almost
all the way to the cockpit), which means that trimming the # 150 requires bringing the jib sheets almost all the way in. If you
get constant overrides because you're pulling in such a long amount of line, try this procedure instead:
- Wrap the jib sheet just once or twice around the winch.
- Trim the jib sheet by hand as far as you can go.
- When it gets too hard to trim the jib sheet by hand, add 3 wraps to the jib sheet and tell grinder # 1 to grind.
- At this point grinder # 1 can pop the winch handle into the winch and grind.
- When it gets too difficult to trim the jib further by hand, help grinder # 1 trim the jib to the proper position by
tailing the jib sheet as grinder # 1 grinds.
- When tailing, pull the jib sheet FIRMLY. If you don't pull the jib sheet firmly, the line will
slip around the winch (especially in heavy wind), and grinder # 1 will need to add wraps around the winch. Adding wraps is not
good because it slows down the tack.
- Continue to tail the jib sheet until grinder # 1 grabs the tail and tells you to “Get The Runner.“
- Put on the runner:
- Grab a winch handle for the secondary winch, or ask grinder # 1 to give you a handle.
- Wrap the runner 2 or 3 times around the secondary winch, bring the line in by hand, and then grind it until you hear the mast
start to make a popping sound.
- If sailing close-hauled: Sit on the high rail with your weight out as far as possible.
- If not sailing close-hauled: Go back down in the cockpit and work with grinder # 1 to trim the jib.
- When working in the cockpit, take a look every once in a while to see if there are any boats on the leeward side where the
driver can't see (in the 10-12 o'clock or 12-2 o'clock positions). Report any boats to the driver.
Tips on tacking:
- In heavy wind, blow the jib sheet earlier (e.g., when the jib luffs, rather than when the jib is
back-winded). If you wait for the jib to be back-winded, it will be under full stress once it crosses over to the leeward side and take
much more effort/time to bring in.
- In light wind, don't blow the jib sheet. Wait until the jib is back-winded, and then ease out
the jib sheet with the turn of the boat. The goal is to keep the wing shape of the jib, thus allowing draw (power) on the new leeward side
of the jib. Once the clew gets around the mast, blow the old jib sheet and grind in the new working jib sheet.
- Before you climb down into the cockpit, tell the crew "WEIGHT OUT." Having a grinder in the cockpit instead of on the rail can
cause us to lose 0.5 knots in speed. The crew can counteract some of the loss in the speed by getting their weight out.
- If you hear someone yelling “LAZY,” it means the lazy jib sheet is stuck on something (e.g., one of the grinders may be
standing on the line). Check around the cockpit to see if anything is preventing the lazy jib sheet from running free, and do whatever is
necessary to set it free. One place where the lazy jib sheet frequently gets stuck is the turning block near the primary winch – you
may need to un-twist the line in order for it to run through the block.
- It's important to complete each tack as fast as possible.
- The boat can lose a lot of time if the grinders don't trim the jib to full power as quickly as possible. It's like if we have
the engine off and the boat is just coasting.
- The jib should move smoothly and quickly from one side of the boat to the other. Ideally there should be no pauses in the motion of
the jib as it crosses the boat.
- The faster you trim the jib, the less effort it requires: Pulling the jib in is much easier before it catches the wind and comes
under full stress/power.
- You need at least 3 wraps around the winch in order to trim the jib sheet completely.
- In heavy wind, you may need 4 wraps. If you execute the tack quickly, however, you can get away with 3 wraps, since the jib is not
under as much stress when you trim it. This is advantageous because you're less likely to get an override with 3 wraps instead of 4.
- The runner only needs to be put on when sailing close-hauled.
Rounding the Weather Mark
Prior to the Mark
- When we're close to the weather mark, the skipper announces either “PORT POLE/STARBOARD HALYARD”
or “STARBOARD POLE/PORT HALYARD.”
- For a port pole:
- The pole is on the port side.
- The afterguy is on the port side (same side as the pole).
- The spinnaker sheet is on the starboard side (opposite the pole).
- For a starboard pole:
- The pole is on the starboard side.
- The afterguy is on the starboard side (same side as the pole).
- The spinnaker sheet is on the port side (opposite the pole).
- NOTE: For the time being, we are always hoisting the spinnaker with a starboard pole and a
port halyard, and doing a bear-away set around the weather mark.
- The crew should be able to hoist the spinnaker IMMEDIATELY after the weather mark (within two boat lengths of the mark).
For that to happen, the grinders and the deck crew must prepare the pole and all the lines well BEFORE the weather mark.
- The deck crew:
- Brings up the turtle from the cabin (the grinders can help with this if needed).
- If the wind is light, ask the captain if we want to go with a lighter/bigger spinnaker than our normal 1.5 oz. spinnaker.
- Attaches the turtle to the pulpit.
- Attaches the afterguys and spinnaker sheets to the spinnaker clews.
- Attaches the correct halyard to the spinnaker head.
- (After the last tack) raises the inboard end of the pole, and sets the pole on the port (left) or starboard (right) side.
- Shouts “RAISE THE POLE” and pushes the pole up to horizontal.
- Grinder # 2:
- For the last tack before the weather mark:
- After you take the runner off the winch, grab the spinnaker sheet from the lazarette cover, and
wrap the spinnaker sheet around the winch two times.
- Don't bother to put on the new runner (there isn't time – we usually round the mark and bear away very soon after the
tack).
- When you're finished tailing on the last tack, immediately climb down into the cockpit and stand in the front part of the
cockpit.
- Prepare the pole for the spinnaker hoist:
- Foreguy: Uncleat the foreguy so that the deck crew can raise the pole.
- Topping lift:
- If there is a crew member at the mast: That crew member will pull the topping lift until the
pole is horizontal, and then ask the cockpit to tension and lock the topping lift. Make sure Nancie tensions and locks the
topping lift.
- If there is no crew member at the mast: Pull the topping lift until the pole is horizontal, then lock the topping lift. Ask
the foredeck crew to push up the pole if you have trouble raising it.
- Afterguys:
- Untie the slip knots from both afterguys.
- Prepare the starboard afterguy:
- Wrap the line 2 times around the primary winch and tension it lightly (don't pull the spinnaker out of the chute).
- Put a winch handle in the winch, so you can grind the afterguy if you need to.
- Note: for now, we always hoist the spinnaker with a starboard pole, so prepare the starboard afterguy. If this changes,
always use the afterguy on the same side as the pole.
- Prepare to pull back the afterguy as soon as the skipper gives the “hoist” command.
- Grinder # 1:
- For the last tack before the weather mark:
- Before the tack, remind grinder # 2: "AFTER YOU TAKE OFF THE RUNNER, GET THE SPINNAKER SHEET READY."
- As soon as you're done grinding, tell grinder # 2 to "COME IN THE COCKPIT AND GET THE AFTERGUY READY."
- Hold the jib sheet and get ready to ease it out.
At the Mark
- Grinder # 1:
- Ease out the jib sheet as the boat turns around the weather mark.
- Grinder # 2:
After the Mark (Spinnaker Hoist)
- Skipper gives the command: 3–2–1, Hoist
- The deck crew pulls the spinnaker halyard up as quickly as possible and yells “MADE” when the spinnaker gets to the top.
- Grinder # 1:
- Cleat off the jib sheet.
- Pull in the spinnaker sheet quickly to stretch the foot of the spinnaker.
- Use long arm motions to sheet in quickly.
- Note that the spinnaker comes out in two surges: it's easy to pull out the spinnaker at first, then it gets hard, then it gets
easy again.
- When it gets hard to pull the spinnaker sheet, push one foot against the cockpit bench for extra leverage.
- Be prepared for the second surge or you may fall backwards.
- Sheeting in and pulling back the afterguy separates the tack and the clew, which prevents the spinnaker from getting any twists
or wraps while it is hoisted.
- Watch the spinnaker as it comes out of the turtle.
- As soon as the foot of the spinnaker is stretched out, let out the
spinnaker sheet completely so the spinnaker is easy to hoist.
- If the spinnaker starts to fill before the hoist is complete, release the sheet immediately
so that the deck crew can complete the hoist.
- If the deck crew asks the cockpit to deflate the spinnaker, release the spinnaker sheet so that they can complete the hoist.
Otherwise keep flying the spinnaker so that it draws power, even if it takes the deck crew a long time to complete the hoist.
- As soon as the deck crew yells “MADE,” sheet in and start flying the spinnaker.
- After the hoist, put a winch handle in the secondary winch, so you can grind if you have trouble
trimming in the spinnaker sheet by hand.
- Better yet, ask the mainsheet trimmer to put in the winch handle, so that you can keep your eyes on the spinnaker.
- If the wind is heavy, ask the boom pusher to grind for you.
- Check the Windex and the pole:
- The pole should be 90° to the wind (move the pole forward or back if necessary).
- The pole should not be skying (tighten the foreguy if necessary).
- The entire pole should be set high for a broad reach, low (2 or 3 feet off the deck) for a beam reach.
- Remind the crew: "EVERYONE SHOULD GET PREPARED FOR A JIBE."
- Ask grinder # 2 to put the lazy (usually starboard) spinnaker sheet on the winch.
- Make sure that the deck crew does a cowboy to put the lazy spinnaker sheet on top of the pole.
- Grinder # 2:
- When the skipper gives the “HOIST” command, pull back the afterguy quickly to stretch the
foot of the spinnaker. This helps the spinnaker come out of the turtle without any twists or wraps.
- After the foot of the spinnaker comes out of the turtle, move the pole forward again, to make it easier
for the deck crew to complete the hoist.
- Be quick when you bring the pole back and forward again, or the spinnaker will fill with wind and be difficult to hoist.
- As soon as the deck crew yells “MADE,” pull back the afterguy until the pole is at about
75° from the 12 o'clock position. Cleat the afterguy.
- Tension and cleat the foreguy after the pole is in place.
- Prepare for a jibe:
- Wrap the lazy afterguy lightly around the primary winch, but don't tension it –
the foredeck crew needs slack in the line for jibes.
- Prepare the lazy spinnaker sheet:
- Remove the slip knot from the lazy spinnaker sheet.
- Move the line from the lazarette cover to the cockpit bench.
- Wrap the line 2 times around the winch, and tension it lightly.
- Make sure that the deck crew does a cowboy to put the lazy spinnaker sheet on top of the
pole.
- Adjust the lines that shape the mainsail:
- Confirm that the cunningham is off completely. Then check the luff of the mainsail – if you
see wrinkles, put a little cunningham back on.
- Make sure the deck crew releases the outhaul flattener.
- Make sure the deck crew puts on the boom vang.
- Clean up the cockpit: Put all the lines (jib sheets, spinnaker halyard, foreguy, etc.) in the companionway to keep the cockpit
clear.
- If we get a twist or hourglass in the spinnaker during the hoist:
- Separate the tack and the clew to help remove the twist:
- Grinder # 1 should pull in the spinnaker sheet.
- Grinder # 2 should pull back the pole.
- Tell the foredeck crew to pull down on the leech (the edge opposite the pole).
- Rod may also steer the boat “by the lee” (the wind will cross the centerline of the boat without jibing); this creates
eddies that help unwrap the spinnaker, but the crew needs to be on the lookout for an accidental jibe when we sail by the lee.
Notes on the spinnaker hoist:
- The above procedure for hoisting the spinnaker applies when the boat does a bear-away set
(i.e., rounds the weather mark and then bears away from the wind).
- On a jibe set, the boat rounds the weather mark and then immediately jibes. The procedure for hoisting
the spinnaker is the same for a jibe set as for a bear-away set, except that the pole can't be raised until after the jibe –
basically the hoist has to wait until after the jibe.
- When reaching, Northern Light may sail significantly faster with both a jib and a spinnaker.
Be prepared to keep the jib up after the spinnaker hoist, or to raise the jib again if we lowered it at the beginning of a reaching leg.
Sailing to Lee
In certain circumstances (e.g., if there are not enough crew members), the boat may sail downwind with a jib instead of a spinnaker.
Jibing with a jib is very similar to tacking: The mainsail and jib have to cross from one side of the boat to the other.
- During a jibe, the boom comes across the cockpit hard – be sure to duck.
- After the jibe, the jib will be trimmed out far from the boat, since we're sailing downwind. Thus there is no urgency to trim
the jib in hard-and-fast, as when we're sailing to weather.
The rest of this section describes the procedures for sailing with a spinnaker. In general:
- Grinder # 1 stands in the back part of the cockpit and trims the spinnaker sheet.
- Grinder # 2 stands in the front part of the cockpit and works the pole
(topping lift, foreguy, and afterguy).
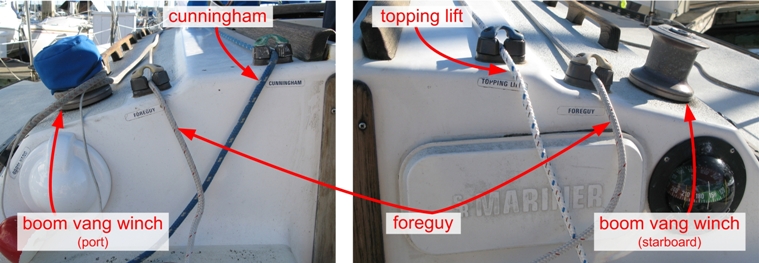
Figure 3: Cockpit Console
Flying the Spinnaker
- Grinder # 1:
- The goal is to get the luff (upwind edge of the spinnaker between the head and the spinnaker pole) to curl or “wink”:
- sheet in
- sheet out until the luff starts to curl
- when the luff curls too much, sheet back in but only a little bit – there should still be some curl
- repeat the steps above constantly – sheet out to get more curl, then sheet in a bit
- If you have trouble sheeting in:
- Try wrapping the sheet once around your hand.
- Push one foot against the cockpit bench for better leverage.
- Use a winch handle to grind (or ask the boom pusher to grind for you). The better option is to grind yourself,
because you can react more quickly. Sit on the cockpit bench near the secondary winch and either let out the sheet or grind in
the sheet as necessary.
- The boats power comes almost entirely from the spinnaker, so focus solely on trim dont look at anything else, dont talk to the
crew – just adjust the spinnaker constantly for curl.
- When the skipper commands Heating It Up:
- Grind in the spinnaker sheet as the boat heads up. Fly the spinnaker on a beam reach.
- Tell grinder # 2 to put the pole forward.
- Remind the crew to get on the windward rail.
- Let out the spinnaker sheet as the boat heads down. Fly the spinnaker on a broad reach again.
- Grinder # 2:
- When the skipper commands Pole Forward:
- Let out the afterguy to move the pole forward a bit.
- Tension the foreguy.
- When the skipper commands Pole Back:
- Release the foreguy.
- Bring in the afterguy to move the pole back a bit.
- Tension and lock the foreguy.
- The afterguy and the foreguy pull the pole in opposite directions – REMEMBER TO RELEASE/TENSION THE
FOREGUY EVERY TIME YOU ADJUST THE AFTERGUY.
- Watch the wind indicator at the top of the mast and adjust the angle of the pole even if the skipper
does not give any commands. The default position for the pole is 75° from 12 o'clock, but ideally you should
adjust the pole so that it's perpendicular to the direction of the wind.
- Every time you move the pole forward or back, say “POLE FORWARD” or “POLE BACK” – this lets grinder # 1
know that he may need to adjust the spinnaker sheet.
- Watch the pole – if it starts to sky, bring in and lock the foreguy.
- If grinder # 1 has trouble bringing in the spinnaker sheet by hand, help grind the spinnaker sheet.
- Get ready for the next maneuver by cleaning up the lines in the cockpit as much as possible.
- Call out the heel angle periodically, e.g. “heel 15.”
- When the skipper commands Heating It Up:
- As the boat heads up, move the pole forward until it's 3 feet off the forestay.
- As the boat heads back down, move the pole back to its normal position.
- Be prepared to execute these maneuvers (pole forward and pole back) quickly.
Notes on flying the spinnaker:
- If the boat goes into death rolls, the grinders should de-power the sails in this sequence:
- Release the boom vang.
- Releasing the boom vang de-powers the mainsail.
- There may be another crew member assigned to the boom vang position, but grinder # 2 should be prepared to blow the boom vang
in case that crew member is not sitting near the boom vang.
- Bring the spinnaker pole forward.
- Release the spinnaker sheet.
- Try releasing a long segment (2+ feet) of the spinnaker sheet first.
- If the boat is still rolling dangerously after that, blow the spinnaker sheet completely.
- In light wind we may switch to the lightweight spinnaker sheets. The
lightweight sheets are “singles” – there is only one line on each side of the boat.
- Grinder # 1 uses the leeward line as a spinnaker sheet.
- Grinder # 2 uses the windward line as an afterguy.
Jibing
- Skipper gives the command: Prepare to Jibe
- Grinder # 1:
- Prepare the new (lazy) spinnaker sheet: wrap the line twice around the winch.
- When the pulpit person is sitting in the pulpit, tell grinder # 2 to bring the pole forward 4 feet.
- After grinder # 2 moves the pole forward:
- Let the working spinnaker sheet out 4 feet.
- Tension the new (lazy) spinnaker sheet and hold it in your hand. At this point you should be
holding one sheet in each hand.
- Tell grinder # 2: “I HAVE BOTH SHEETS.”
- Watch the Windex to see what the spinnaker will do when the deck crew trips the pole.
(Sheet in if we're not on a broad reach?)
- Grinder # 2:
- When grinder # 1 gives the command, move the pole forward 4 feet.
- Uncleat the foreguy.
- Do not prepare the new afterguy early – the deck crew needs slack in the line so that they can bring it up to the crew member
in the pulpit.
- When Rod asks “Is everybody ready?”, report to grinder # 1 that you're ready.
- Note: The distance between the boat and the spinnaker is very important:
- If the spinnaker is too close to the boat, it may not fill up properly, which could cause it to collapse as soon as the pole is
tripped.
- If the spinnaker is too far from the boat (too far forward), the spinnaker will “swing” too far to port and starboard
as the boat rolls, which increases the chance of a collapse.
- The grinders can adjust the distance of the spinnaker by moving the afterguy and spinnaker sheet in or out.
- Skipper asks: Is everybody ready?
- Skipper gives the command Trip the Pole and turns the boat.
- Stay low – watch out for the boom coming across the cockpit.
- Grinder # 2:
- Topping lift:
- If there is a crew member at the mast: That crew member will ask the cockpit to unlock
the topping lift so that they can control the topping lift from the mast. Make sure Nancie unlocks the topping lift.
- If there is no crew member at the mast: Unlock the topping lift and lower the pole slowly. Make sure to keep the pole under
control – you don't want it to come smashing down on someone. The deck crew should help guide the pole down.
- Uncleat the old afterguy.
- Prepare the new afterguy by wrapping it loosely around the winch. Don't tension the new afterguy
– the crew member in the pulpit needs slack in order to put the line in the spinnaker pole jaws.
- The deck crew:
- Attaches the pole to the new afterguy and yells “MADE.”
- Pushes the pole toward the new afterguy.
- Raises the topping lift at the mast.
- Grinder # 2:
- As the boat turns, duck under the boom.
- As soon as the deck crew yells “MADE,” pull back the new afterguy until the pole is
perpendicular to the wind.
- Look at the pole closely as you pull the afterguy. If you see a problem with the way the deck crew put the afterguy in the pole,
tell grinder # 1 immediately so he doesn't let go of the spinnaker sheet (grinder # 1 needs to keep flying the spinnaker with the
sheets while the foredeck crew corrects the problem with the afterguy).
- After the pole is in place, tension and cleat the foreguy.
- Topping lift:
- If there is a crew member at the mast: That crew member will pull the topping lift until
the pole is horizontal, and then ask the cockpit to tension and lock the topping lift. Make sure Nancie tensions and locks the
topping lift.
- If there is no crew member at the mast: Pull the topping lift until the pole is horizontal, then lock the topping lift. It can be
hard to pull the topping lift from the console, so ask the foredeck crew to push the pole up if necessary.
- Grinder # 1:
- As the boat turns, duck under the boom and let out the old spinnaker sheet
another 4 feet or so. (This is the same line you let out 4 feet when grinder # 2 moved the pole forward.
Visualize the boat turning away from the wind (old pole side). By letting out the sheet opposite the pole, you are keeping the
spinnaker square to the wind.)
- Watch the Windex and make small, simultaneous adjustments to the two sheets to keep the spinnaker square to the wind.
- In practice you shouldn't have to make any significant adjustments – Rod will steer the boat to keep the spinnaker
filled.
- If the spinnaker collapses:
- Ask somebody on the foredeck (Nat) to grab the windward clew and
hold it out on the windward side.
- If the spinnaker gets an hourglass (twist), pull back both sheets to separate the clews (ask grinder # 2 for help).
- When grinder # 2 starts grinding the new afterguy, let go of the sheet that's attached to the new
afterguy. Don't let go too early – make sure the pole is on its way back first.
- Be on the lookout for problems with the way the afterguy was put into the pole jaws. If there is a problem with the new afterguy,
keep flying the spinnaker with both sheets while the deck crew brings the pole back to the pulpit and fixes the problem.
- Start flying the spinnaker using the new sheet (opposite the pole).
- If the spinnaker sheet is not responsive, check to make sure that grinder # 2 has uncleated and released the old afterguy.
- Move the winch handle to the winch with the new working spinnaker sheet (or ask the mainsheet trimmer
to do this).
Notes on the spinnaker jibe:
- Topping lift:
- In the procedures described above, the deck crew raises the pole during the jibe by pulling the topping lift on the starboard side
of the mast. The advantage of having the deck crew raise the topping lift is that this allows grinder # 2 to pull the afterguy and bring
back the pole. In other words, the deck crew can raise the topping lift at the same time that grinder # 2 brings the pole back. If there
is nobody available on the deck crew to raise the topping lift, grinder # 2 must pull up the topping lift first, and then pull back the
afterguy.
- If there is nobody available on the deck crew to raise the topping lift at the mast, it is very important for the deck crew to push
the pole up into position toward the new afterguy. This is because it is very difficult to raise the pole using solely the topping lift
from the cockpit. If the deck crew does not push the pole up into position, it can take a long time for grinder # 2 to raise the pole,
which delays the jibe.
- The procedure described above is the procedure we use for a dip-pole jibe. When we use the
lightweight spinnaker sheets we can't do a dip-pole jibe because there is no lazy
afterguy. Instead we do an end-for-end jibe, where the deck crew rotates the pole so that the outboard end becomes the inboard end and vice
versa. The procedure for an end-for-end jibe is as follows:
- Skipper gives the command: Prepare to Jibe
- Grinder # 1:
- Ask grinder # 2 to bring the pole forward 4 feet.
- Grinder # 2:
- Uncleat the foreguy.
- Uncleat the afterguy and unwrap the afterguy from the winch.
- When grinder # 1 asks you, move the pole forward 4 feet.
- Hand the afterguy to grinder # 1.
- Skipper gives the command Trip the Pole and turns the boat.
- Grinder # 1:
- When grinder # 2 moves the pole forward, let the spinnaker sheet out 4 feet.
- Grab the afterguy from grinder # 2.
- As the boat turns, duck under the boom and let out the old spinnaker sheet another 4 feet or so.
- Continue to fly the spinnaker using the two sheets. Watch the Windex and keep the spinnaker square to the wind.
- After the deck crew yells “MADE,” give the new afterguy to grinder # 2.
- The deck crew rotates the pole, attaches it to the lightweight lines again, and yells “MADE.”
- Grinder # 2:
- Take the new afterguy from grinder # 1, wrap it around the winch, and cleat it off.
- Tension and cleat the foreguy.
Rounding the Leeward Mark
Description of douses:
- Stretch-foot douse:
- The crew douses the spinnaker on the leeward side of the boat. The entire douse happens prior to the mark.
- Floater douse:
- The deck crew trips the pole and the grinders fly the spinnaker bare-pole.
- The grinders bring the spinnaker around to the windward side of the boat, and the deck crew douses the spinnaker as the boat turns
around the mark.
- Mexican douse:
- The deck crew trips the pole and the grinders fly the spinnaker bare-pole.
- The boat jibes.
- The grinders bring the spinnaker around to the new windward side of the boat, and the deck crew douses the spinnaker as the boat
turns around the mark.
Prior to the Mark
Stretch-Foot Douse
- The deck crew hoists the jib. (This happens before the spinnaker douse – the boat always has an active sail on the foredeck.)
- Grinder # 2:
- Trim the jib for a broad reach or a beam reach (depending on wind direction), and cleat off the jib sheet.
- Grinder # 1:
- Give 5 reminders to crew:
- outhaul flattener (Foss) – put on the outhaul flattener when we're close to the mark
- halyard release (Robin) – you're on release for a stretch-foot douse / _____;
send people to the rail as soon as you have control of the spinnaker
- skirts (Nat) – remember to give me a skirt
- (grabbers) – put the spinnaker OVER the lifelines and UNDER the jib sheets
- captain (Rod) – the command is “stretch-and-drop”
- Skipper gives the command: Stretch-and-drop
- Grinder # 1:
- Bring in the spinnaker sheet hard to stretch the foot of the spinnaker tightly along
the leeward side of the boat.
- Use long arm motions. Push one foot against the cockpit bench if you need to. Grind if you need to
(ask the mainsheet trimmer to tail).
- When the deck crew has control of the spinnaker, release the spinnaker sheet.
- Climb up on the rail and prepare to tail the jib sheet for grinder # 2.
- Grinder # 2:
- Let out the afterguy and bring the pole all the way forward until it's 2 feet off the forestay.
- Tension and lock the foreguy.
- The deck crew:
- Gathers the spinnaker and stuffs it through the hatch on the foredeck.
- Commands “LOWER THE POLE”, and prepares to guide the pole to the center of the deck.
- Grinder # 2:
- When the deck crew says “LOWER THE POLE”, release the topping lift and carefully lower
the pole.
- Tension the topping lift after the deck crew stows the pole at the base of the mast.
- Double-check that the deck crew has secured the topping lift in the jaws at the inboard end of the pole. If the topping lift
is not secured in the jaws of the pole, the jib will not be able to cross the boat on a tack.
- Tension the foreguy.
Floater Douse or Mexican Douse
- The deck crew hoists the jib. (This happens before the spinnaker douse – the boat always has an active sail on the foredeck.)
- Grinder # 1:
- Give 5 reminders to crew:
- outhaul flattener (Foss) – put on the outhaul flattener when we're close to the mark
- halyard release (Robin) – you're on release for a _____ douse / _____;
send people to the rail as soon as you have control of the spinnaker
- pole/skirts (Nat) – trip the pole immediately if it's still up when Rod counts down;
remember to give me a skirt
- mainsheet (John) – coil the spinnaker sheets and take out the winch handle
(and then start bringing in the mainsheet for the mark rounding)
- captain (Rod) – TRIP-TEN (i.e., trip the pole before you start counting down from ten)
- Tell 3 things to grinder # 2:
- Trim the jib:
- floater douse – loose close haul
- Mexican douse – broad reach
- Bring the pole forward 4 feet.
- When grinder # 2 moves the pole forward, let the spinnaker sheet out 4 feet.
- Grab both sheets and tell grinder # 2 “I HAVE BOTH SHEETS.”
- Prepare the jib sheet and the jib winch:
- Floater douse –
- Get the winch with the jib sheet ready for you to grind.
(The working jib sheet should have 3 wraps and there should be a handle in the winch.)
- Mexican douse –
- After the deck crew trips the pole, put on the lazy jib sheet and tension it.
(Tighten the lazy jib sheet to the point where the jib has a hook in it.)
- Get the winch with the lazy jib sheet ready for you to grind.
(The lazy jib sheet should have 3 wraps and there should be a handle in the winch.)
- When I say “POP IT,” you pop the old jib sheet and start grinding the new jib sheet.
- Watch the Windex to see what the spinnaker will do when the deck crew trips the pole.
(Sheet in if we're not on a broad reach?)
- Grinder # 2:
- Floater douse:
- Trim the jib for a loose close haul and cleat off the jib sheet.
- Mexican douse:
- Trim the jib for a broad reach (the boat will jibe, and the jib will be trimmed tightly on the
new leeward side after the jibe).
- Double-check that the deck crew has rigged the jib lines correctly:
- The jib sheets should be rigged on top of the pole and in front of the topping lift.
- Tension both jib sheets so that the lines do not slip under the pole during the douse.
- The jib halyard should be on the correct winch – on the port side in the center of the boat.
- If there is a crew member at the mast: That crew member will ask the cockpit to unlock the topping lift
so that they can bring the pole down about 2' using the topping lift at the mast. Unlock the
topping lift.
- If there is no crew member at the mast: Unlock the topping lift, lower the pole 2', and lock the topping lift.
- When grinder # 1 asks you, move the pole forward 4 feet. Bringing the pole forward makes it
easier to fly the spinnaker after the pole is tripped – see the note above under "Jibing" about the importance of
keeping a good distance between the spinnaker and the boat.
- When Rod asks “Is everybody ready?”, report to grinder # 1 that you're ready.
- Skipper asks: Is everybody ready?
- Skipper gives the command: Trip the Pole
- Grinder # 1:
- Fly the spinnaker bare-pole.
- When the deck crew trips the pole, watch the spinnaker closely – if the spinnaker swings to leeward,
let out the windward line and bring in the leeward line. The goal is to fly the spinnaker as if on a reach.
- Watch the Windex and make small, simultaneous adjustments to the spinnaker sheets to keep the spinnaker flying.
- If the spinnaker collapses:
- Ask somebody on the foredeck (Nat) to grab the windward clew and hold it out on the windward side. This helps the spinnaker fill
up again.
- Try different things – e.g., let the sheets in or out.
- If we're close to the mark, just release the leeward spinnaker sheet and bring the spinnaker around to the windward side.
(For a Mexican douse, wait until after the boat jibes, otherwise the spinnaker will get fouled up in the jib when the jib
crosses the boat.)
Grinder # 2:
- Floater douse:
- Prepare the winch with the jib sheet so you can start grinding as we round the mark: The working jib sheet should have 3 wraps,
and there should be a handle in the winch.
- Mexican douse:
- After the deck crew trips the pole, uncleat the afterguy and take the afterguy off the winch.
- Put the lazy jib sheet on the winch and tension it: Tighten the lazy jib sheet to the point where
the jib has a hook in it, and cleat off the lazy jib sheet. This makes bringing in the jib much faster when we
jibe around the mark.
- Prepare the winch so you can start grinding as we round the mark: The lazy jib sheet should have 3 wraps, and
there should be a handle in the winch.
At the Mark (Spinnaker Douse)
Floater Douse
- Grinder # 1:
- When the bow is even with the mark, blow the working spinnaker sheet (usually the starboard sheet).
- If Rod counts down from 10, blow the sheet on 7.
- In strong wind, blow the sheet earlier (~ 9).
- Bring in the lazy (windward) spinnaker sheet FAST.
- Bring in the sheet until the spinnaker tack is all the way to the turning block near
the stern.
- If you need extra leverage, push a foot against the cockpit bench.
- Climb up on the rail immediately after you finish bringing the spinnaker back.
- If the spinnaker didn't make it very far back, pull the spinnaker sheet and/or the clew to haul the spinnaker
as far back as possible.
- Sit down and brace yourself to tail.
- Tail for grinder # 2.
- Put on the runner.
- Grinder # 2:
- Grind in the jib for a full close haul.
- Cleat off the jib sheet and tell grinder # 1 to “GET THE RUNNER.”
- Climb up on the rail as soon as possible.
- At this point the grinders are the only people who are available to weigh down the rail, so it's critical to
get on the rail as soon as possible. When the deck crew is on the rail, one of the grinders can go back down and clean up
the lines in the cockpit.
Mexican Douse
- Grinder # 1:
- When the boat jibes, blow the old windward spinnaker sheet (usually the starboard sheet).
- If Rod counts down from 10, blow the sheet on 7. (We want to bring the spinnaker around later for a Mexican douse
than for a floater douse.)
- In strong wind, blow the sheet earlier (~ 9).
- Say “POP IT” when you blow the spinnaker sheet.
- Bring in the new windward spinnaker sheet FAST.
- Bring in the sheet until the spinnaker tack is all the way to the turning block near
the stern.
- If you need extra leverage, push a foot against the cockpit bench.
- Climb up on the rail immediately after you finish bringing the spinnaker back.
- If the spinnaker didn't make it very far back, pull the spinnaker sheet and/or the clew to haul the spinnaker
as far back as possible.
- Sit down and brace yourself to tail.
- Tail for grinder # 2.
- Put on the runner.
- Grinder # 2:
- When grinder # 1 says “POP IT,” blow the old jib sheet.
- Grind in the new jib sheet for a full close haul.
- Cleat off the jib sheet and tell grinder # 1 to “GET THE RUNNER.”
- Climb up on the rail as soon as possible.
- At this point the grinders are the only people who are available to weigh down the rail, so it's critical to
get on the rail as soon as possible. When the deck crew is on the rail, one of the grinders can go back down and clean up
the lines in the cockpit.
Stretch-Foot Douse
- The spinnaker will have been doused prior to the mark.
- Grinder # 2:
- Make sure the working jib sheet is prepped: The line should have 3 wraps and there should be a handle in the winch.
- Wait until we start heading up, and then grind in the jib sheet for a close haul.
- Cleat off the jib sheet and tell grinder # 2 to “GET THE RUNNER.”
- Climb up on the rail as soon as possible.
- Grinder # 1:
- Climb up on the rail, tension the jib sheet, and tail for grinder # 2.
- Put on the runner.
After the Mark
- Grinder # 1:
- Tell the crew "GET ON THE RAIL AS SOON AS YOU CAN" (our heel makes a big difference in boat speed).
- Adjust the lines that shape the mainsail:
- Make sure the outhaul flattener is on.
- Make sure the boom vang is off.
- After the mainsail is in the close haul position and fully adjusted (e.g., the outhaul flattener is on), check the luff.
Put on the cunningham just enough to get rid of the wrinkles in the luff.
- Grinder # 2:
- Once the foredeck crew is sitting on the rail, go back down in the cockpit and clean up the lines:
- Topping lift: tension and cleat the line. Double-check that the line is secured in the pole jaws.
- Afterguys: Put the lines in the companionway.
- Spinnaker sheets: Coil the lines and put them on top of the lazarettes near the stern (route them under the mainsheet).
- Do a rectangular sweep around the cockpit, starting with the leeward winches:
- Working jib sheet: Coil the line and put it on the floor in the very front part of the cockpit. Make sure the line has a
stopper knot at the end.
- Lazy runner: Take the line out of the porthole, wrap it around the winch 3 times, tension it, and put the tail end back
through the porthole.
- Working runner: Put the tail end of the runner through the porthole into the cabin below.
- Lazy jib sheet: Tension the line, wrap it around the winch 3 times so it's ready to go on the next tack, and put the line
on the floor in the rear part of the cockpit. Make sure the line has a stopper knot at the end.
- Put winch handles in the leeward winches.
- After the afterguys and spinnaker sheets have been brought forward and clipped to the bow pulpit:
- Make sure the afterguys and spinnaker sheets run outside the lifelines along the rail.
- Put Siberian hitch knots near the blocks, or ask the deck crew and mainsheet trimmer to do so.
After the Finish
- Grinder # 1:
- Take care of 4 electronic items:
- GPS watch:
- Press LAP (= lower button) when we cross the finish line, and call out the TOD.
- If we cross the line at the same time as another boat, call out their sail number.
- Note how far behind other boats cross the line (call out the times).
- Stop the watch timer.
- GoPro camera: Turn off the camera and:
- Hero2 HD: bring the camera up to the yacht club (need to charge the batteries). Make sure to bring up John's plastic
pouch as well.
- Hero: Just bring the memory card up to the club.
- Handheld radio: Put the radio in the cubby, or if the battery is low, leave the radio in the
charging cradle.
- GPS unit: Ask the navigator for the waypoint # of the race committee boat and get the coordinates
from the GPS unit. (Note that the RC boat will probably be the last waypoint entered, i.e., the highest waypoint #.)
- Grinder # 2:
- BOTH GRINDERS:
- Secure the spinnaker sheets and the afterguys. Before Rod turns on the engine, make sure none of the
lines is dragging in the water.
- Loosen the leech line and the foot line on the jib if they were tightened during the race.
The deck crew usually brings down the jib quickly, so you need to wait until you're flaking the jib on the dock before you can
loosen the lines.
|