 Home
Home
»
Carpool
»
Contact Info
»
Debrief
»
Fleet Info
»
Links
»
Logistics
»
Marks & Courses
»
Photos & Videos
»
Procedures
»
Results
»
Rules
»
Sitemap
»
|
Procedures
Deck Crew
The deck crew raises and lowers the sails on the foredeck – the jib and the spinnaker – as the boat moves about the course. The deck crew also helps the sails move across the boat on tacks and jibes.
At a high level, the responsibilities of the deck crew are as follows:
- Sailing to the weather (upwind) mark:
- sit on the windward (high) rail with weight as far out as possible
- when the boat tacks:
- move from one side of the boat to the other
- as the jib crosses the boat, watch the jib sheets and make sure they dont get caught on anything
- prevent “skirts:” watch the foot of the jib and make sure it doesn't get caught outside the lifelines
- Sailing to the leeward (downwind) mark (spinnaker sets):
- sit on the leeward (low) side of the boat
- spinnaker hoist: prepare and hoist the spinnaker; lower the jib
- spinnaker jibe: move the spinnaker pole from one side of the boat to the other
- spinnaker douse: raise the jib; lower the spinnaker
Each of the above procedures involves multiple steps, and requires good crew coordination and constant communication. The deck boss and the foredeck boss assign crew members to perform certain tasks in order to carry out these procedures. The procedures are described in detail below. Please review the procedures, and ask the deck/foredeck boss or other experienced crew members if you have any questions.
If you're not familiar with some of the terms or concepts on this page, look them up in the Glossary and review the Sailing Basics page.
Halyards
The halyard jumper, the halyard tailer, and the halyard grinder work together to hoist (raise) the sails.
Before the Race
- Familiarize yourself with the sails:
- mainsail:
- The mainsail is only raised one time, when we leave the dock.
- jib:
- The jib is used on all legs except downwind legs – it is usually lowered shortly after we round the weather (upwind) mark, and hoisted shortly before we round the leeward (downwind) mark.
- spinnaker:
- The spinnaker is only used on downwind legs – it is hoisted shortly after we round the weather (upwind) mark, and doused (lowered) as we round the leeward (downwind) mark.
- Familiarize yourself with the halyards (the lines that are used to raise the sails):
- The halyards lie flat against the mast, and run up and down the mast.
- There are 4 different halyards – two on the starboard side of the mast, and two on the port side of the mast:
- mainsail halyard:
- white line with red markings on the starboard side of the mast
- jib halyard:
- white line with red markings on the port side of the mast
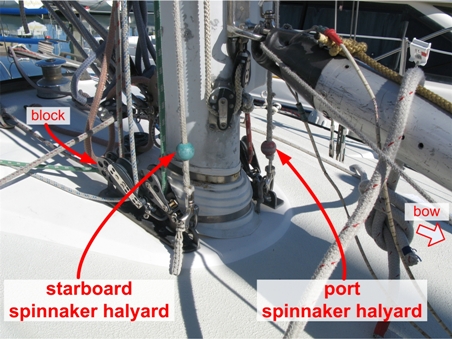
- the spinnaker has two halyards:
- starboard spinnaker halyard:
- green line on the starboard side of the mast
- port spinnaker halyard:
- red line on the port side of the mast
- The spinnaker is hoisted using the halyard on the opposite side of the spinnaker pole. For example, if the boat is going to have a "port pole" (the pole is set on the port side), the spinnaker is hoisted using the starboard spinnaker halyard.

Figure 1: Haylards
- Familiarize yourself with the winches:
- Each halyard has a dedicated winch – see the four winches around the mast in Figures 2 and 3 below.
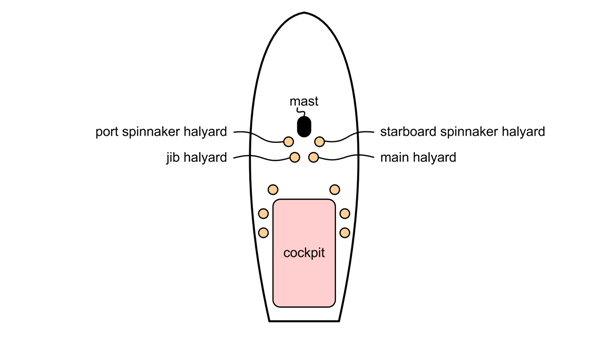
Figure 2: Halyard Winches
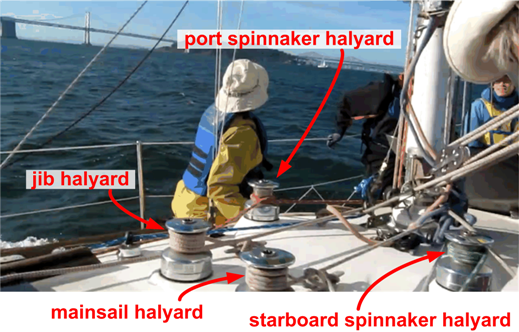
Figure 3: Halyard Winches
- Review the description of how to use the winches. Some things to remember:
- Always wrap lines clockwise around a winch.
- Start with one wrap around a winch to reduce the chance of an override. Add two more wraps around the winch before grinding.
- When tailing, pull a line up toward the sky rather than horizontally or down toward the deck. Pulling a line up reduces the chance of an override.
- Each winch has two speeds. Grind clockwise first to hoist a sail quickly, and when that gets too hard, grind counter-clockwise.
- After a sail has been hoisted, the tail end of the halyard is tied off around a cleat using a perfect cleat. Practice tying a perfect cleat until you can do it quickly without thinking about it.
- Think about where on deck you want to be for each hoist:
- Halyard jumper:
- The jumper stands or kneels on the port or starboard side of the mast, depending on which halyard is being used. Practice with both positions and see which one works better for you – i.e., see whether you can pull the halyard down harder (and thus hoist the sail faster) when you're standing versus kneeling.
- Halyard tailer:
- The tailer kneels down on the deck a little bit behind the winch that's being used. Generally you want to be a three or four feet behind the winch, so that you have room to swing your arms with big motions as you pull the halyard.
- Halyard grinder:
- The grinder kneels down on the deck on the opposite side of the boat from the winch that's being used. While you need to be near the winch, you don't want to interfere with the tailer, who will be pulling the tail end of the halyard behind the winch.
- Practice the motions you'll be using for each hoist:
- Halyard jumper:
- Pull the halyard down and away from the mast using STRONG, HARD motions.
- Halyard tailer:
- Pull the halyard UP and away from the winch using LONG, FAST arm motions.
- Halyard grinder:
- Grind the winch handle clockwise first, then counter-clockwise.
- Once the race is under way, listen to Rod and the deck captain for statements like “We'll hoist the spinnaker as soon as we round the mark,” or “Let's get the jib up.” These are cues for you to get into position and get ready for action – think about which sail you're hoisting, which halyard you pull to raise that sail, and which winch to use for that halyard.
- The quicker the halyard jumper, tailer, and grinder raise a sail, the better. Not only does the boat sail faster, but it actually takes less effort to hoist the sail if you raise it quickly, before it catches the wind and becomes fully powered up.
Hoisting a Sail
Special notes for the spinnaker hoist:
- The crew should be able to hoist the spinnaker IMMEDIATELY after the weather (upwind) mark – ideally within two boat lengths of the mark. For that to happen, the halyard jumper and the halyard tailer must get into position and be prepared to pull the correct halyard well BEFORE the weather mark. Do all the preparatory work in steps 1-5 below early enough so that the skipper can give the “HOIST” command immediately after the mark.
- After we go around the weather mark, we typically do a bear-away set, where we simply turn the boat downwind (bear away from the wind). Occasionally we do a jibe set, where we keep turning the boat until it jibes. On a jibe set, the crew must wait for the jib to cross to the other side of the boat before they can raise the spinnaker pole and hoist the spinnaker. Either way, you should get prepared BEFORE we reach the weather mark, so that you can hoist the spinnaker as soon as possible after we turn around the mark.
- For the time being we are always hoisting the spinnaker with a starboard pole and a port halyard, and doing a bear-away set around the weather mark.
Procedure for hoisting a sail:
- Identify the sail that is being hoisted (main, jib, or spinnaker).
- Identify the halyard that is used to hoist that sail (see the description of the 4 halyards above).
- Note for the spinnaker: Our current procedure is to only hoist the spinnaker with the port spinnaker halyard.
- Identify the winch that is used for that halyard (see the winch diagram above).
- Get into position:
- Halyard jumper:
- Stand or kneel on the port or starboard side of the mast, depending on which halyard is being used.
- If you're hoisting the spinnaker, leave some distance between your body and the mast, so that you have room to pull the halyard down with arm-over-arm motions.
- Halyard tailer:
- Kneel down on the deck a little bit behind the winch that's being used.
- Halyard grinder:
- Grab the winch handle from the plastic pocket on the port side of the mast.
- Kneel down on the deck on the opposite side of the boat from the winch that's being used
- Be sure to get into position early, especially for the spinnaker hoist. You should be ready to hoist the spinnaker as soon as we get on the last starboard tack on the way to the weather mark.
- Halyard tailer:
- Uncleat the halyard, and wrap the tail end of the halyard one time around the winch.
- You only want one wrap around the winch. If you put more wraps than that, you will get an override as the sail is being hoisted.
- Always wrap lines clockwise around a winch.
- When the skipper gives the command 3-2-1, Hoist:
- Halyard jumper:
- How you pull the halyard depends on which sail you're hoisting:
- If you're hoisting the mainsail or the jib:
- Grab the halyard with both hands, and pull it down and away from the mast.
- Pull the halyard with STRONG, HARD motions.
- If you're hoisting the spinnaker:
- There is very little resistance when you hoist the spinnaker. The focus is on speed.
- Pull the halyard with long arm-over-arm motions, like you're swimming the crawl stroke.
- Don't break stride – go AS FAST AS YOU CAN until the spinnaker is all the way to the top.
- Halyard tailer:
- Grab the tail end of the halyard behind the winch, and pull it towards you.
- Pull the halyard tail UP, away from the deck. This reduces the chance of getting an override on the winch.
- Use LONG, FAST arm motions. Grab the halyard tail with your arm extended well in front of you, and pull your arm back until it's well behind you. Then repeat with the other arm. Tailing with long arm motions helps you to keep up with the jumper and hoist the sail quickly.
- If you get an override on the winch, clear it (un-cross the line) as quickly as possible.
- While you're hoisting, watch the sail to see if there are any problems, and listen to the other crew members – they will call out if they see a problem.
- If a problem comes up, stop hoisting. Depending on what the problem is, you may be able to resume hoisting shortly after you stop. Sometimes you may need to lower the sail a little bit, wait for an obstruction to be cleared, and then resume hoisting.
- If you're hoisting the mainsail or the jib:
- Halyard jumper:
- Keep pulling on the halyard until it's too hard to pull by hand.
- Halyard tailer:
- When it gets too hard for the jumper to pull the halyard by hand, wrap the halyard 2 more times around the winch. (As always, add the wraps clockwise.) The halyard should have a total of 3 wraps at this point.
- Tell the halyard grinder to start grinding.
- Continue pulling on the tail end of the halyard while the grinder grinds.
- Halyard grinder:
- After the tailer has added 2 wraps around the winch, put the winch handle in the winch, and grind the sail the rest of the way up.
- The winch has two speeds. Grind clockwise first to hoist a sail more quickly, and when that gets too hard, grind counter-clockwise.
- When you hear the skipper or deck captain yell Made, the sail has reached the top, and you can all stop hoisting.
- If you're hoisting the spinnaker:
- Halyard jumper:
- Keep pulling on the halyard until the spinnaker is all the way to the top.
- When the spinnaker is all the way to the top, yell Made.
- Halyard tailer:
- After you hear "MADE," wrap the halyard 2 more times around the winch. As always, add the wraps clockwise. The halyard should have a total of 3 wraps at this point.
- Note: Do not grind to hoist the spinnaker – the jumper should be able to pull the spinnaker all the way to the top.
- Halyard tailer:
- Tie the tail end of the halyard in a perfect cleat.
- Clear the halyard off the deck by putting the tail end down the companionway.
- The tail end of the halyard can foul up the lines in the cockpit – it's very important to keep the deck and the cockpit clear by putting the tail end of the halyard down the companionway.
After the hoist:
- After the spinnaker hoist, the crew douses the jib.
- Halyard tailer:
As soon as you hear "MADE" (indicating that the spinnaker hoist is complete), uncleat the jib halyard and hold the halyard in your
hand. Look to see that the foredeck boss is ready, and then blow the jib halyard (take the halyard off the winch and let the halyard
go). Wait for the foredeck boss to prep the jib for hoisting (by raising it a foot or so up the forestay), and then tension and
cleat off the jib halyard.
After the jib hoist, the crew douses the spinnaker.
Mainsail
Boom Pusher & Sitter
The primary responsibilities of the boom pusher are to push the boom away from the boat until the boom is nearly perpendicular to the boat, and to lean against the boom so that it stays in that position.
When we sail downwind, the mainsail should be positioned nearly perpendicular to the boat. This helps the mainsail catch more wind and increases the boat's speed on downwind legs. See the figure below, and specifically the points of sail labeled broad reach, for the ideal position of the mainsail on downwind legs:
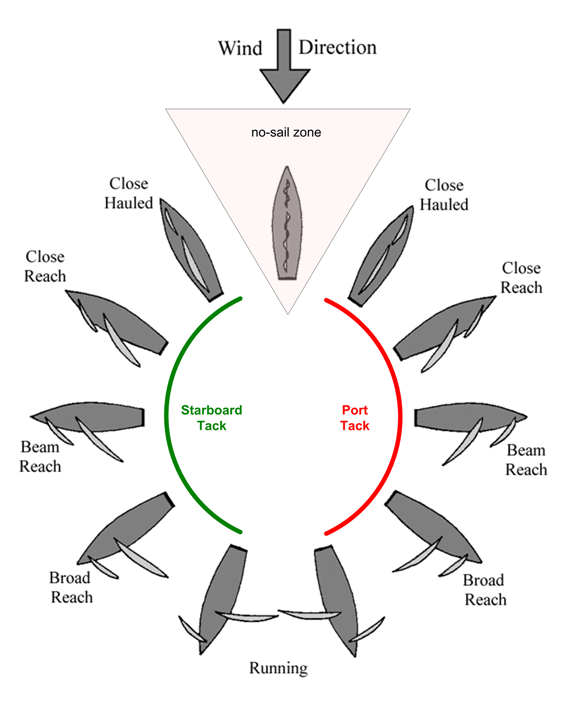
Figure 4
When we go around the weather (upwind) mark, the mainsheet trimmer releases the mainsheet, which lets the boom rotate away from the boat. There is some resistance on the boom, however, which prevents the boom from rotating out far enough. That is where you come in: You must push the boom out until it's nearly perpendicular to the boat, and then lean with your back against the boom so that the boom stays in that position.
Procedure for the boom pusher & sitter:
- As we approach the weather (upwind) mark, get into position near the boom. Stand somewhere where you have leverage to
push the boom.
- When we go around the mark, release the outhaul flattener.
- As the mainsheet trimmer lets out the mainsail, put both hands on the boom and push the boom out HARD. Imagine that you are pushing a
stalled car off the road – your body should be in a similar stance as you push the boom out.
- When the boom is nearly perpendicular to the boat, turn to face the stern (rear of the boat), and lean against the boom with your back.
This keeps the boom away from the boat as we sail downwind.
- If and when we jibe, you'll hear the skipper command: prepare to jibe. In this situation you should crouch
down on the deck, let the boom pass over you as the boat turns, and lean back against the boom after it has crossed to the other side of the
boat.
- Continue to lean against the boom for the entire downwind leg, unless someone asks you to stop leaning against the boom, or you have
another job to do. You'll know we're near the end of the downwind leg when the skipper gives instructions to the crew about how to douse
(lower) the spinnaker.
Tips for the boom pusher:
- When you are pushing/leaning against the boom, always be aware of the wind direction. When gusts of wind hit the sail from the direction
of the bow, the mainsail becomes back-winded, and it will start to rotate back toward the centerline of the boat
(i.e., in the opposite direction that you are trying to push it). Too much back-wind in the mainsail can cause an
accidental jibe, where the boom suddenly swings to the opposite side of the boat against the intention of the
driver. This is a dangerous situation because someone could be hit by the boom.
- If you notice the mainsail beginning to luff or if you feel the boom beginning to push back against you, tell the cockpit crew,
“We are getting back-wind in the main.” If there is too much back-wind for you to hold the boom out and it is about to
overpower you, warn the crew by yelling “Duck!” and drop to the deck to let the boom pass over you.
- We may have several downwind legs in a race. You should push out the boom and lean against it on every downwind leg.
- When we go around the weather (upwind) mark, the crew will be busy preparing to hoist the spinnaker, so there may not be anyone to remind
you to push out the boom – try to remember to do this yourself.
- After we go around the weather mark, we typically do a bear-away set, which means we turn the boat and
start heading downwind (bearing away from the wind). Occasionally we do a jibe set, which means we keep turning
the boat until it jibes. If you hear the skipper say that we are doing a jibe set, crouch down on the deck and let the boom cross over you to
the other side of the boat before you start pushing the boom out.
- The mainsheet trimmer may at times want to bring the mainsail closer to the boat (depending on the direction of the wind relative to the
boat). When you're leaning against the boom, watch what the mainsheet trimmer does in the cockpit – if he starts to bring in the
mainsheet, stop leaning against the boom momentarily. Listen to directions from the mainsheet trimmer, who
will give you specific instructions if he needs you to do something.
- In heavy wind, grinder # 1 may ask you for assistance grinding the winch with the working spinnaker sheet.
When this happens, stop leaning against the boom, and go kneel down next to the winch that grinder # 1 is using. When grinder # 1 asks you
to do so, grind the winch (turn the handle in the clockwsie direction).
- On some courses, we round the weather (upwind) mark and sail perpendicular to the wind rather than downwind – see the points of
sail labeled beam reach in Figure 4 above. In such situations, you can still help to push the boom away from
the boat, but the boom does not need to go out as far, and you do not need to lean against the boom. Again, listen to instructions from the
mainsheet trimmer, who will tell you what to do.
- Once in a while the skipper may ask you to push out the foot (bottom edge) of the mainsail. When the skipper
asks you to do this, he wants you to push out the actual sail, as opposed to the boom. (Pushing out the sail helps it to achieve a more
optimal shape and increases boat speed.) When the skipper asks you to push out the foot, put both hands on the sail material just above
the boom, and push the sail material downwind (away from you).
Boom Vang
The primary responsibility of the crew member who handles the boom vang is to put on (tighten) and take off (release) the boom vang.
The boom vang is a line that controls the height of the boom (see the photo on the right in Figure 5 below). Specifically:
- Putting on the boom vang pulls the boom down toward the deck. This reduces the draft (curve) of the mainsail.
- Releasing the boom vang lets the boom ride up toward the sky. This increases the draft of the mainsail.
You put on the boom vang at the beginning of a leeward (downwind) leg. As we round the weather (upwind) mark and start heading downwind, the mainsheet trimmer lets out the mainsheet until the boom is nearly perpendicular to the boat. When the boom is out that far, the wind pushes the mainsail against the shrouds, which wears the mainsail down and reduces its efficiency. Putting on the boom vang reduces the draft of the mainsail and keeps it off the shrouds.
You release the boom vang at the start of a weather (upwind) leg, just after we round the leeward (downwind) mark. This lets the boom ride up, which increases the draft of the mainsail and makes its shape more efficient for sailing to weather.
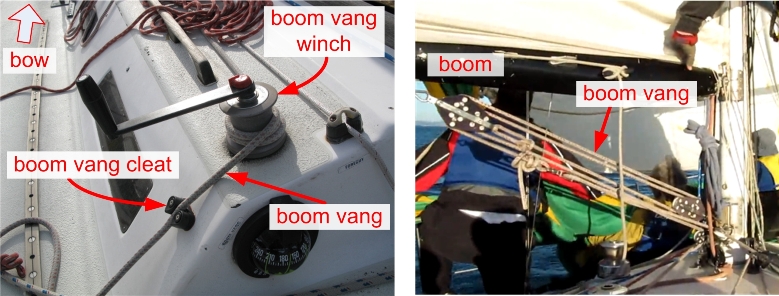
Figure 5: Boom Vang
Before the race:
- Locate the boom vang. It is a white line with red markings (see the photo on the left in Figure 5). The line starts at a cleat on one side of the cockpit, wraps around a winch, runs through multiple blocks (pulleys) under the boom, and ends at an identical winch and cleat on the other side of the cockpit.
- Practice taking off the boom vang:
- Simply take the line out of the boom vang cleat and let it go. You can take the line out of either cleat (port or starboard).
- Practice putting on the boom vang:
- Wrap the boom vang CLOCKWISE around either the port or starboard boom vang winch.
- Pull the tail end of the boom vang tightly with one hand. You MUST pull the tail end tightly in order for the winch to work.
- For other winches on Northern Light, there will usually be different people tailing and grinding, but for the boom vang winches, the same person both tails and grinds.
- Put your free hand on the winch handle and rotate the winch handle clockwise. The boom vang winch only has one speed – you must rotate the winch handle clockwise. Continue to pull the tail end of the boom vang with one hand as you rotate the winch handle with the other hand.
- When the boom vang is tight enough, cleat off the line.
- Putting the boom vang in the cleat can be a little tricky. The easy way to cleat off the line is to push the line on top of the cleat, and continue to rotate the winch handle as you press the line into the cleat.
Procedure for the boom vang:
- At the start of a downwind leg (right after we go around the weather mark), put on the boom vang:
- Grind the line and cleat it off.
- While we're on the downwind leg:
- Occasionally the boat goes into death rolls, where it rolls sharply to port and then sharply to starboard. When this happens, the crew must be prepared to depower the boat immediately on command from the skipper. Taking off the boom vang is one way to depower the boat.
- Stay near the boom vang cleat and listen carefully to the skipper. If the skipper asks you to take off the boom vang, IMMEDIATELY uncleat the boom vang and let the line go.
- At the start of an upwind leg (right after we go around the leeward mark), take off the boom vang:
- Simply take the line out of the cleat and let it go.
Tips for the boom vang:
- Be proactive in putting on and taking off the boom vang. The skipper, the mainsheet trimmer, or the deck boss may give you commands to put on or take off the boom vang, but you don't need to wait for such commands – it's better if you can remember to take care of the boom vang on your own.
- After we go around the weather mark, we typically do a bear-away set, which means we turn the boat and start heading downwind (bearing away from the wind). Occasionally we do a jibe set, which means we keep turning the boat until it jibes. If you hear the skipper say that we are doing a jibe set, crouch down on the deck and let the boom cross over you to the other side of the boat before you put on the boom vang.
- When we leave the dock, we usually sail downwind and practice a spinnaker set. While we do this the boom vang should be on. Remember to take off the boom vang at the end of our practice set, when we head back up toward the start line. Make sure the boom vang is off before the start of the race.
Outhaul Flattener
The primary responsibility of the crew members who handle the outhaul flattener is to put on (tighten) and take off (release) the
outhaul flattener.
The outhaul flattener is a line that stretches or loosens the foot (bottom edge) of the mainsail. Stretching or loosening the foot
changes the shape of the mainsail and makes the boat go faster. Specifically:
- Pulling the outhaul flattener stretches the foot of the mainsail tight. This makes the mainsail flat, which helps the boat go faster
when sailing to weather (upwind).
- Releasing the outhaul flattener loosens the foot of the mainsail. This makes the mainsail curved, which helps the boat go faster when
sailing to lee (downwind).
You release the outhaul flattener at the start of a leeward (downwind) leg, just after rounding the weather mark. This is around the
same time that the crew hoists the spinnaker.
You put the outhaul flattener back on at the end of the leeward leg, just before rounding the leeward mark. This is around the same time
that the crew douses the spinnaker. It's important to put on the outhaul flattener before the boat rounds the
leeward mark and starts heading to weather: Once the boat is heading upwind, the mainsail is under a lot of stress, and it's much harder to
pull the outhaul flattener tight.
There are usually two people assigned to the outhaul flattener position because it's hard to pull the outhaul flattener sufficiently tight.
When putting on the outhaul flattener, both people need to grab the line and pull simultaneously.
Before the race:
- Locate the outhaul flattener. It is a white line that comes out of the boom on the starboard (right) side of the mast, as shown in
Figures 6 and 7 below.

Figure 6: Outhaul Flattener
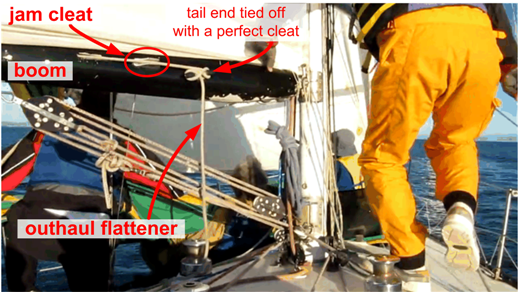
Figure 7: Outhaul Flattener
- The outhaul flattener is held in place by a jam cleat (a cleat with upper & lower teeth into which you jam the line). Practice
putting the outhaul flattener in and taking it out of the jam cleat.
- The tail end of the outhaul flattener is wrapped around another cleat on the boom, next to the jam cleat. You should use a
perfect cleat to tie off the tail end of the outhaul flattener. Practice tying a
perfect cleat until you can do it quickly.
Procedure for the outhaul flattener:
- After we go around the weather (upwind) mark, release the outhaul flattener:
- Untie the perfect cleat, and take the outhaul flattener out of the jam cleat.
- Let the outhaul flattener run out so that it's not under stress.
- Tie off the tail end using a perfect cleat.
- Before we go around the leeward (downwind) mark, put on the outhaul flattener:
- Untie the outhaul flattener from the cleat.
- Grab the outhaul flattener with both hands and pull it HARD towards you. The line should come out at least a couple of feet.
Put one foot up on the mast and lean back with your weight. Typically two or more crew members need to pull on the outhaul flattener
at the same time in order to tighten the line sufficiently.
- Jam the outhaul flattener into the jam cleat, and tie off the tail end using a perfect cleat.
- Be sure to put on the outhaul flattener before we reach the leeward mark – it's much harder to tighten the outhaul flattener
sufficiently when we're sailing to weather (into the wind).
Tips for the outhaul flattener:
- Be proactive in putting on and taking off the outhaul flattener. The skipper, the mainsheet trimmer, or the deck boss may give you
commands to put on or take off the outhaul flattener, but you don't need to wait for such commands – it's better if you can remember
to take care of the outhaul flattener on your own.
- The boom pusher is usually in a good position to release the outhaul flattener at the weather mark. Coordinate with the boom pusher if
you want him or her to take responsibility for releasing the outhaul flattener at the weather mark.
- After we go around the weather mark, we typically do a bear-away set, which means we turn the boat and
start heading downwind (bearing away from the wind). Occasionally we do a jibe set, which means we keep
turning the boat until it jibes. If you hear the skipper say that we are doing a jibe set, crouch down on the deck and let the boom cross
over you to the other side of the boat before you let out the outhaul flattener.
- When we leave the dock, we usually sail downwind and practice a spinnaker set. While we do this the outhaul flattener should be off.
Remember to put the outhaul flattener back on at the end of our practice set, when we head back up toward the start line.
Make sure the outhaul flattener is on before the start of the race.
Reefing
Reefing the mainsail is the act of partially lowering the mainsail, so that less sail area is exposed to the wind and the boat is not overpowered.
Reefing the mainsail involves lowering the mainsail, and holding it in a lowered position using a hook that pulls the sail down (toward the deck), and a reefing line that pulls the sail back (toward the stern). The hook that pulls the sail down attaches through a cringle (a metal ring that surrounds a hole in the luff of the sail). The reefing line is a red line that runs through the boom and that is held taught by a clamp on the boom near the mast.
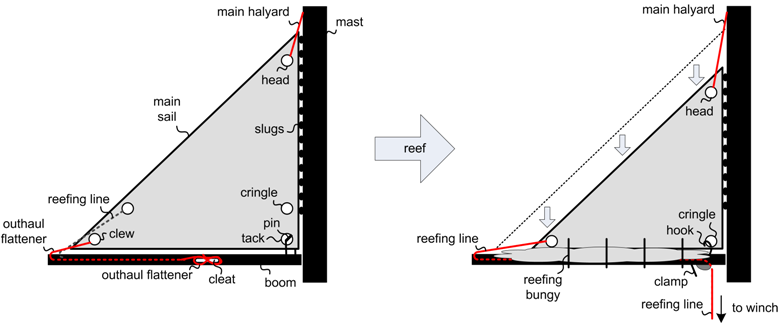
Figure 8: Reefing the Mainsail
The deck boss should coordinate and direct crew members to put on a reef.
The procedure for putting on a reef is as follows:
- Attach the boom lift (not negotiable until we master the procedure).
- Release the thumbscrews at the mast.
- Lower the main halyard ~ 4 or 5 feet.
- Attach the cringle to the boom.
- Host the main until the luff is taught, and lock the main halyard.
- Grind the red reefing line. When done, cleat the reefing line (on the bottom of the boom).
- Tie the blue bungees around the mainsail and boom. Use a reef knot, or better yet a slipped reef knot, which is easy to untie.
- Disconnect the boom lift.
The procedure for shaking out a reef is as follows:
- Shake out the reef on a downwind leg (we won't lose as much speed since the spinnaker provides most of the power).
- Attach the boom lift (not negotiable until we master the procedure).
- Untie the bungees.
- Ease the red reefing line. Note: need to winch the reefing line a little bit in order to release the cleat under the boom.
- Ease the main halyard and unhook the cringle from the boom.
- Hoist the main, putting the luff slugs into the track on the mast. Lock the main halyard.
- Attach the thumbscrews at the mast.
- Disconnect the boom lift.
Notes on reefing:
- If it's too hard/dangerous to put on the boom lift, an alternative is to hold up the boom by tightening the reefing line. Note that the reefing line needs to be tightened in tandem with lowering the halyard: Lower the halyard a bit, tighten the reefing line, lower the halyard a bit more, tighten the reefing line, etc.
- If the mainsail does not slide down easily, use the cunningham to pull it down.
- Removing (shaking out) the reef is the reverse of the above procedures. Remember to feed the slugs on the mainsail into the track as the mainsail is raised.
Jib
Jib Sheet Pullers & Clew Walker
The jib sheet pullers and the clew walker help the jib cross the boat as quickly as possible when we tack. Specifically:
- The jib sheet pullers pull the jib sheets in the direction that the jib is moving.
- The clew walker monitors the bowline knots that are tied to the jib clew (the corner of the jib), and makes sure the clew and the bowline knots move quickly and smoothly around the mast and the shrouds.
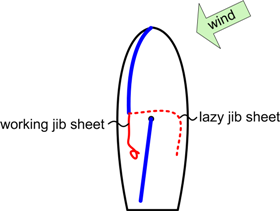
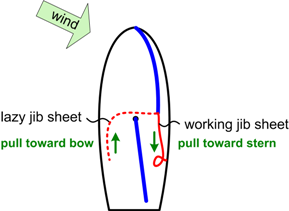
The jib is attached to two jib sheets:
- The leeward (downwind) jib sheet is the working jib sheet – this line is under stress, since the grinders use it to trim the jib.
- The windward (upwind) jib sheet is the lazy jib sheet – this line is not active and is not under stress.
When the boat tacks, the jib sheets switch – the working jib sheet becomes the lazy jib sheet, and vice versa.
The jobs of the jib sheet pullers and the clew walker are very important, because if the jib sheets or the bowline knots get stuck on anything, the jib won't be able to cross to the other side of the boat. The consequences of that are:
- The boat will not be able to complete the tack quickly.
- Once the jib does finally cross to the other side of the boat, the jib will be under stress, and it will take more effort and more time for the grinders to trim the jib to its proper position.
- The boat will lose a lot of speed by not being able to power up immediately after the tack (and it takes a long time to get an 8,000 lb. boat back up to speed).
Before the race:
- Locate the jib sheets – they are thick white lines with red markings (see Figure 10 below).
- Locate the sticking points where the jib sheets are most likely to get stuck (see Figure 11 below):
- the mast
- the wire shrouds on each side of the mast
- the black turning blocks (pulleys) on the deck near the cockpit winches

Figure 10: Jib Sheets
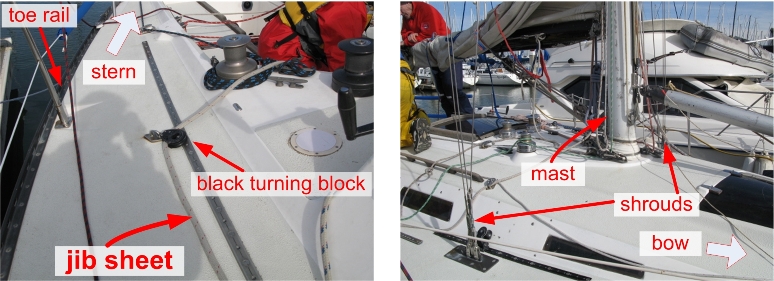
Figure 11: Jib Sheet Sticking Points
Procedure for the LAZY jib sheet puller:
- When we tack, the skipper will give the commands “Ready About”, and then “5-4-3-2-1, Hard-a-Lee”.
- When the skipper says “Ready About,” move quickly across the boat to what will be the new high side.
- You should be the first person to get off the rail and cross the boat, but tune in to how early you get to the other side. If you find that you have a lot of time once you get to the other side, try leaving the windward side later so that you weigh down the rail longer. The more weight we have on the rail, the faster our boat speed. As you get comfortable crossing the boat, you may be able to wait until the skipper gets to “3” or “2” before you leave the rail.
- Try crossing the boat by stepping in front of the mast – this is usually faster than crawling under the boom. Also try sitting on the rail in front of the mast, so that you have a shorter path to travel.
- Get into a good position:
- Crouch down on the deck facing the cockpit.
- Brace one foot against the metal toe rail and grab the wood side rail with one hand.
- Grab the jib sheet with your free hand. Reach well in front of you to grab the jib sheet, as you will need to pull the line with long arm motions.
- Watch the grinders in the cockpit. When the grinders blow the jib sheet off the winch, pull the jib sheet with LONG, FAST arm motions TOWARD THE BOW.
- If the jib sheet gets stuck, do whatever you need to do to free it up.
- If the jib sheet is jammed at the turning block near the cockpit winch, give the jib sheet repeated HARD jerks to remove the jam. If that doesn't work, ask someone who is near the block to un-twist the line and pull it through the block.
- If the jib sheet is stuck at the shrouds or at the mast, ask the clew walker to move the clew around the shrouds/mast.
- If there is no clew walker, you will need to move the clew yourself: Grab the jib clew (the corner of the jib) or the bowline knots tied to the clew (see Figure 10 above), and physically move the jib clew around the shrouds/mast.
- If you see the jib sheet stuck somewhere where you can't reach, give LOUD instructions to the crew about where the jib sheet is stuck and what it's stuck on (e.g., “COCKPIT – SOMEONE'S STANDING ON THE LAZY”). See the tips below for how to give good instructions.
- When the jib is in position on the new leeward side of the boat, sit on the rail and get your weight out as far as possible.
Procedure for the WORKING jib sheet puller:
- When we tack, the skipper will give the commands “Ready About”, and then “5-4-3-2-1, Hard-a-Lee”.
- Do not cross the boat with the other crew members – stay on what will be the new low side.
- Get into a good position:
- Crouch down on the deck facing the bow.
- Brace one foot against the metal toe rail and grab the wood side rail with one hand.
- Grab the jib sheet with your free hand. Reach well in front of you and grab the jib sheet near the fairlead, as you will need to pull the line with long arm motions.
- Watch the grinders in the cockpit. When the grinders blow the jib sheet off the winch, pull the jib sheet with LONG, FAST arm motions TOWARD THE COCKPIT.
- If the jib sheet gets stuck, do whatever you need to do to free it up.
- If the jib sheet is stuck at the shrouds or at the mast, ask the clew walker to move the clew around the shrouds/mast, or do so yourself: Grab the jib clew (the corner of the jib) or the bowline knots tied to the clew (see Figure 10 above), and physically move the jib clew around the shrouds/mast.
- If you see the jib sheet stuck somewhere where you can't reach, give LOUD instructions to the crew about where the jib sheet is stuck and what it's stuck on (e.g., “COCKPIT – SOMEONE'S STANDING ON THE LAZY”). See the tips below for how to give good instructions.
- After the jib crosses to your side of the boat:
- Pull the jib sheet very HARD to get the jib close to its final position.
- Hold the clew (the corner of the jib) as close to the cockpit as possible – ideally the grinders should be able to grind in the jib to its final position within a few seconds.
- When the jib is in position, cross the boat to the high side, sit on the rail, and get your weight out as far as possible.
Procedure for the clew walker:
- When we tack, the skipper will give the commands “Ready About”, and then “5-4-3-2-1, Hard-a-Lee”.
- When the skipper says “Ready About,” move quickly across the boat to what will be the new high side.
- Let the lazy jib sheet puller cross the boat first. You should be the second person to cross the boat.
- Tune in to how early you get to the other side. If you find that you have a lot of time once you get to the other side, try leaving the windward side later so that you weigh down the rail longer. The more weight we have on the rail, the faster our boat speed. As you get comfortable crossing the boat, you may be able to wait until the skipper gets to “3” or “2” before you leave the rail.
- In general you should sit on the rail in front of (or even with) the mast, and cross the boat by stepping in front of the mast – this is faster than crawling under the boom.
- Get into a good position:
- Crouch down on the deck near the shrouds, facing the cockpit.
- Brace one foot against the toe rail and grab a stanchion (a short metal pole that supports the lifelines) with one hand.
- Watch the grinders in the cockpit. When the grinders blow the jib sheet off the winch, watch the jib clew and the bowline knots as they go around the shrouds close to you, around the mast, and then around the shrouds on the other side of the boat.
- If the bowline knots get stuck on anything, grab them and physically move them around the shrouds and the mast.
- Note: It may be easier to grab the jib foot or leech rather than the bowline knots. Use care if the jib is flapping, as the knots can whip around and hit you pretty damn hard.
- If you see the jib sheet stuck somewhere where you can't reach, give LOUD instructions to the crew about where the jib sheet is stuck or what it's stuck on (e.g., “COCKPIT – SOMEONE'S STANDING ON THE LAZY”). See the tips below for how to give good instructions.
- After the clew has cleared the mast and the shrouds, sit on the rail and get your weight out as far as possible.
Tips for the jib sheet pullers & clew walker:
- Give good instructions: When the jib sheet gets stuck somewhere where you can't reach, you need to give good instructions to the crew about how to clear the jam. Be specific about who the message is directed to, what line is jammed (in this case it's the “lazy”), and where/how the line is jammed. It's best to identify the recipient of the message first. Speak clearly and loudly. Here are a few examples of good instructions:
- COCKPIT – SOMEONE IS STANDING ON THE LAZY
- <name> – YOU'RE SITTING ON THE LAZY
- <name> – UNTWIST THE LAZY AT THE BLOCK
- When the crew crosses the boat, watch the jib sheet closely for potential jams: Warn anybody who looks like they might step or sit on the jib sheet.
- Watch the fairleads: The jib sheets sometimes get pinched hard in the fairleads (see a picture of the port fairlead in Figure 10 above). The fairleads can rotate toward the lifelines or toward the centerline of the boat. Rotate the fairleads toward the lifelines in order to prevent them from pinching the jib sheets.
Skirts
The primary responsibility of the crew member responsible for skirts is to watch the foot (bottom edge) of the jib on every tack and make sure that the jib does not get caught on the stanchions outside the lifelines.
When the boat tacks, the jib crosses from one side of the boat to the other (see Figure 9 above). If the grinders in the cockpit work fast, the jib should stay inside the lifelines (within the perimeter of the boat) during the tack – in this situation, you do not need to do anything. If the grinders do not work fast enough, however, the jib may cross the boat and be positioned outside the lifelines (outside the perimeter of the boat). In this situation, the grinders must grind in one of the jib sheets to bring the jib close to the centerline of the boat. As the grinders grind in the jib sheet and the jib approaches the boat, the foot of the jib typically gets caught on a stanchion (one of the short metal poles that supports the lifelines – see Figure 12 below). When the jib gets caught on a stanchion – this is called a “skirt” – you must lift the foot of the jib and place it inside the lifelines, so that the grinders can keep bringing the jib in.
You should proactively lift the foot of the jib and place it inside the lifelines before it gets caught on a stanchion. The grinders should be able to grind without stopping – if they need to stop and wait for you to clear the skirt, you're not doing your job well.
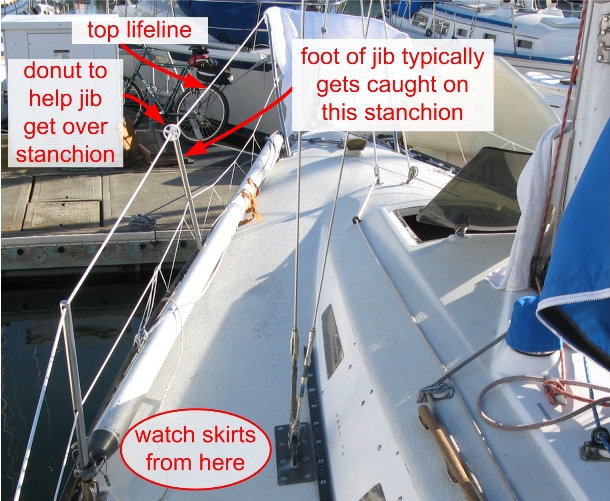
Figure 12: Foredeck Stanchions & Lifelines
Procedure for the skirt position when we tack:
- Before the tack, sit on the windward (high) rail.
- Listen for the skipper to give this sequence of commands (there will be a pause between the commands):
- Grinders Get Ready
- Ready About
- 5-4-3-2-1, Hard-a-Lee
- When the skipper says “Ready About,” get into position:
- Straddle the spinnaker pole and lie down on top of the pole.
- Stay low until the jib passes over you.
- After the jib passes over you, grab the foot of the jib and place it inside the lifelines.
- (New!) Instead of getting off the rail early and straddling the spinnaker pole, stay on the rail.
- When the skipper says “Hard-A-Lee,” get up and position yourself along the lifelines on the foredeck. Stand or crouch near the shrouds – see the oval in Figure 12.
- As the grinders bring in the jib, lift the foot of the jib with your hand and place it inside the lifelines.
- As soon as the foot of the jib is inside the lifelines, cross the boat to the new high side, sit on the rail, and get your weight out as far as possible.
Note that skirts are only an issue when we're sailing close-hauled. If we're sailing off the wind (e.g., on a close reach or a beam reach), it's ok for the jib to be positioned outside the lifelines. But stay vigilant: If we turn and start heading into the wind, the grinders will bring in the jib, and you should watch for and prevent a skirt from happening.
In addition to tacks, there are two specific times when you should watch for and prevent skirts:
- At the start: We typically sail on a close reach as we come up to the start line. Then, as we go around the race committee boat or the buoy SC1, we turn into the wind to a close-hauled position, and the grinders bring in the jib. Watch the jib carefully as we come up to the start line, and lift the foot of the jib over the lifelines when the grinders bring in the jib.
- When we douse the spinnaker: As we go around the leeward (downwind) mark, the deck crew douses (lowers) the spinnaker, and the grinders bring in the jib to a close-hauled position. If you are one of the spinnaker grabbers, you must help the deck crew bring down the spinnaker, but as soon as the deck crew has control of the spinnaker, watch the jib and lift the foot over the lifelines. After the deck crew has control of the spinnaker, handling skirts takes precedence over stuffing the spinnaker down the hatch (the spinnaker no longer delivers power to the boat, whereas the jib does).
Jib Peel
Procedure for putting up a new jib while a jib is already raised:
- Decide if we need to tack.
- The big jib (# 130) must be raised on the leeward side of the small jib (# 95). If we're raising the big jib and the leeward luff track is not available, the boat must tack so that the free luff track is on the leeward side.
- Bring up the new jib and set it on the deck. Ask the grinders to remove the stopper knots from the ends of the jib sheets.
- Attach the tack of the new jib to the hook at the base of the pulpit.
- Run your hands up the luff to the head of the new jib to make sure there are no twists in the sail.
- Attach one of the spinnaker halyards to the head of the new jib:
- If we're raising the new jib using the port luff track, use the port spinnaker halyard.
- If we're raising the new jib using the starboard luff track, use the starboard spinnaker halyard.
- Place the bolt rope at the head of the new jib through the pre-feed and into the free luff track.
- Cleat the halyard so that the new jib does not fall out of the luff track.
- Move the windward car block (fairlead) to the leeward side of the boat in the proper position:
- for the # 95 jib: the car block should be on the forward track, aligned with the aft turnbuckle on the shrouds
- for the # 130 jib: the car block should be on the aft track, aligned with the front end of the aft cabin window
- Untie the lazy jib sheet from the old jib.
- Run the lazy jib sheet through the car block that you just moved, and tie it to the clew of the new jib.
- Hoist the new jib and cleat the halyard.
- The grinders should trim the new jib after it's hoisted.
- Uncleat the halyard for the old jib and lower the old jib to the deck.
- Unclip the halyard from the old jib and attach it to the base of the mast.
- Move the car block that was being used for the old jib to the windward side of the boat in the proper position.
- Untie the remaining jib sheet from the old jib, run it through the car block that you just moved to the windward side of the boat, and tie it to the clew of the new jib.
- Make sure that the jib sheet runs on top of the spinnaker pole.
- Take the old jib off the deck.
- Remember which spinnaker halyard is holding up the new jib – you'll need to use this halyard when you want to lower the jib.
Notes:
- Question: If we're raising the small jib, can we raise it on the leeward side, or must we raise it on the windward side?
- When there are multiple jibs on the foredeck, secure the inactive jib by attaching the head to the same hook that the tack is attached to.
- Attach the head to the hook using the proper orientation that it will have if we use that jib again. That way you can simply take the head off the hook and attach it to the luff track if we use that jib again.
- Consider/experiment with an alternative procedure to tacking at the beginning:
- Keep the lazy car block on the windward side of the boat, but move it to the correct track/position.
- Attach the lazy jib sheet to the new jib on the windward side.
- Hoist the new jib and immediately tack.
- Lower the old jib and then move the other jib sheet to the new jib.
Spinnaker
Overall Procedure for a Spinnaker Set
This section describes the overall procedure for the deck crew on a spinnaker set. The description is divided into the following subsections, which correspond to the main tasks in a spinnaker set:
There are three primary positions on the deck crew responsible for carrying out the tasks above:
- Sails Handler: prepares the sails and attaches the lines (halyards, sheets, and afterguys) to the sails
- Pole: helps raise and lower the spinnaker pole by physically pushing it into position
- Mast: raises/lowers the inboard end of the pole using the gold-colored line at the mast; raises/lowers the outboard end of the pole using the topping lift at the mast
- Special note regarding the topping lift: The topping lift is the line that holds the spinnaker pole up in the air. If the topping lift is not secured properly, the pole can fall down and seriously injure the crew (head traumas are common accidents on sailboats). On Northern Light, the cleat for the topping lift at the mast (see Figure 13 below) does not always hold – the topping lift occasionally pops out of that cleat. The topping lift must be tensioned and cleated at the cockpit in order to hold up the pole. When you put the topping lift in the cleat at the mast, put the palm of your hand on top of the cleat to make sure that the line does not pop out. Continue to cover the cleat at the mast with your hand until you feel that the cockpit has tensioned and locked the topping lift. Never let go of the topping lift until you know the line is secured at the cockpit.
The procedures for the sails handler, pole, and mast positions are described below.
The deck crew includes a number of additional positions to help carry out the work in a spinnaker set. The responsibilities for these additional positions are listed briefly below and described in detail in separate sections (see halyard jumper/tailer/grinder, pulpit, release-on-douse, spinnaker grabbers, skirts, and cowboy). The sails handler, pole, and mast crew members should supervise the crew assigned to these additional positions to make sure they carry out their duties quickly and correctly.
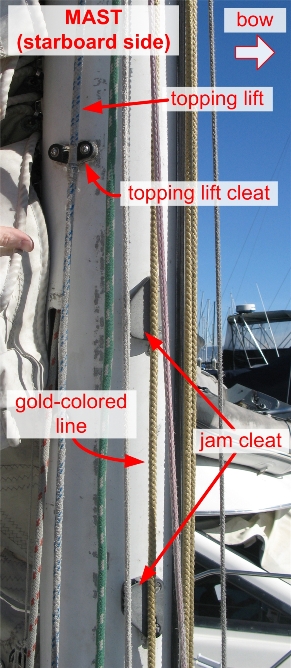
Figure 13: Topping Lift and Gold-Colored Line at the Mast
Spinnaker Prep
- The crew should be able to hoist the spinnaker IMMEDIATELY after the weather mark (within two boat lengths of the mark). For that to happen, the crew must prepare the pole and all the lines well BEFORE the weather mark.
- (New!) Until further notice, we will always hoist the spinnaker with a starboard pole, port halyard, and do a bear-away set around the weather mark. That means the deck crew can complete all the spinnaker prep work and raise the pole immediately after the last tack on the way to the weather mark. Check with the skipper to confirm how many tacks are left before we round the mark, but you should be able to see for yourself: When the boat changes from a port tack to a starboard tack and we can get to the mark without any more tacks, we will have completed the last tack. In practice we've been able to raise the pole about 15 seconds after the last tack.
- Sails Handler
- Bring up the spinnaker turtle from the cabin.
- If the wind is light, ask the captain if we want to go with a lighter/bigger spinnaker than our normal 1.5 oz. spinnaker.
- Clip the turtle to the eyelets on the pulpit using both clips (upper and lower).
- Prepare the spinnaker sheets and afterguys:
- Check that the slip knots are removed from all 4 lines.
- Pull six feet of slack for each spinnaker sheet before you clip the sheet to the spinnaker clew. (This is to make sure that the pole does not pull the spinnaker out of the bag when the pole is raised.)
- Make sure the sheets and the afterguys are routed over (not through) the lifelines.
- Clip the spinnaker sheet shackles to the spinnaker clews.
- Use the small red line to pull open each shackle. Make sure the red line doesnt get fouled up.
- Wait for the skipper to announce either Port Pole/Starboard Halyard or Starboard Pole/Port Halyard.
- Note: For the time being we are always hoisting the spinnaker with a starboard pole and a port halyard, and doing a bear-away set around the weather mark.
- Sails Handler
- Attach the correct halyard to the spinnaker based on the skipper's command:
- Unclip the correct halyard from the base of the mast and look up to make sure that the halyard is clear. (For the time being, always use the port halyard.)
- Bring the halyard to the pulpit, routing it outside the jib.
- Attach the halyard to the head of the spinnaker.
- Mast
- Raise the inboard end of the pole a couple of feet. This allows the bow end of the pole to move from one side of the boat to the other clear of the pulpit.
- Use the gold-colored line on the front of the mast to raise the inboard end of the pole.
- Jam the gold-colored line in the jam cleat (see Figure 13).
- Pole
- Set the bow end of the pole on the port or starboard side per the command from the skipper. (For the time being, always set the pole on the starboard side.)
- Wait before raising the pole:
- For a bear-away set: Wait until after the last tack on the way to the weather mark.
- For a jibe set: Wait until after we round the weather mark and jibe the boat.
- Mast
- After the last tack or the jibe, raise the inboard end of the pole to about 6' high using the gold-colored line.
- Remove the topping lift from the jaws at the inboard end of the pole. (We have to wait until after the last tack or the jibe because if the topping lift is free it may foul the jib sheets when we tack/jibe.)
- Ask the cockpit to release the topping lift.
- Pole
- After the last tack or the jibe, push up the pole until it's parallel with the water.
- Mast
- Pull up the pole with the topping lift until the pole is parallel with the water.
- Cleat the topping lift at the mast.
- Ask the cockpit to lock the topping lift.
- The topping lift pops out of the cleat at the mast easily, so cover the cleat at the mast with your hand until the cockpit confirms it has locked the topping lift.
Spinnaker Hoist
- Mast
- Make sure the halyard jumper and the halyard tailer are in position and ready to go. Supervise the jumper and the tailer and help
them out if needed.
- Skipper gives the command: 3-2-1, Hoist
- Halyard jumper: Jump the correct halyard and yell made when the halyard is at the top.
- Halyard tailer: Wrap the halyard once around the correct winch, and tail using long, fast arm motions. When the jumper yells
“MADE,” add 2 wraps around the winch and tie off the halyard with a perfect cleat.
- Halyard grinder: Do nothing (the jumper should be able to hoist the spinnaker without grinding).
- Mast
- If there is a bad problem with the hoist, ask the cockpit to deflate the spinnaker so that the deck crew can fix
the problem and complete the hoist. (If the problem is not bad, the grinders will continue to fly the spinnaker so that it
can draw power, even though it may take the deck crew a long time to complete the hoist.)
- Make sure a crew member has done a cowboy to put the lazy spinnaker sheet on top of the pole.
- Sails Handler
- If we get an hourglass (twist) in the spinnaker during the hoist, pull down on the leech
(the edge opposite the pole) to help remove the twist.
Lower the Jib
- Sails Handler
- Ask the halyard tailer to release the jib halyard.
- Halyard tailer: Blow the jib halyard.
- Sails Handler
- Lower the luff edge of the jib along the forestay, as quickly as possible.
- After you lower the jib, prep the jib for raising:
- Feed the bolt rope at the jib head through the pre-feed.
- Raise the head one foot or so up the starboard luff track on the forestay.
- Ask the crew member at the mast to tension the jib halyard.
- Pull the bungee cords over the jib. Try to position the jib so that it wont get in the way during the spinnaker jibe.
- Halyard tailer: Tension and cleat off the jib halyard.
Spinnaker Jibe
- Skipper gives the command: Prepare to Jibe
- Pulpit crew (the crew member assigned to the pulpit position): Sit in the pulpit and prepare to receive the outboard end of the spinnaker pole.
- Pole
- Bring the lazy afterguy and the new jib sheet (on the same side of the boat as the lazy afterguy) to the pulpit crew.
- Pulpit crew: Grab the lazy afterguy in the correct orientation in your hand (“pinky to the pit”). Place the new jib sheet in the bend of your hand.
- Mast
- If the pole is set low (when we're on a beam reach instead of a broad reach), raise the mast end of the pole before the jibe. If we don't raise the mast end, the pole will not have room to swing across the boat.
- Take command of the topping lift: Put the topping lift in the cleat on the mast or take it by hand, and then ask the cockpit to release the topping lift. Be aware that there is a great deal of weight on the topping lift at this time.
- Skipper gives the command: Trip the Pole
- Pole
- Trip the pole to release it from the working afterguy. To trip the pole, pull back on the blue cord that's attached to the pole jaws (this works better than pulling down on the red cord).
- Mast
- Take the topping lift out of the cleat (if it's cleated), and lower the pole slowly.
- Pole
- Guide the pole down to the pulpit crew and open the pole jaws.
- Pulpit crew:
- Take the old jib sheet off the pole.
- Put the new jib sheet on top of the pole.
- Put the new afterguy in the pole jaws (“pinky to pole”).
- Tell the person on pole to close the pole jaws.
- Take an extra second to double-check that the afterguy is in the correct orientation and that the jib sheet is routed correctly.
- Yell “MADE!”
- For details see the pulpit procedure.
- Pole
- Close the pole jaws when the pulpit crew asks you to do so.
- (New!) May want to ask the cockpit to tension the new afterguy before raising the pole.
- Take an extra second before pushing the pole back up: Double-check that the afterguy is in the correct orientation and that the jib sheet is routed correctly.
- Raise the pole so that it's parallel with the water, and push out the pole to the donut on the afterguy.
- If you see any problem as you raise the pole (e.g., the afterguy loops around the end of the pole, or the new jib sheet falls off the pole), call out “HALT, RESET THE POLE,” bring the pole back down to the pulpit, and fix the problem.
- Mast
- Relay the “MADE” command to make sure the crew in the cockpit heard it.
- Raise the pole with the topping lift.
- Ask the cockpit to lock the topping lift.
- The topping lift pops out of the cleat at the mast easily, so cover the cleat at the mast with your hand until the cockpit confirms it has locked the topping lift.
- Sails Handler
- If the spinnaker collapses when the grinders are flying it bare-pole, grab the
windward clew of the spinnaker. Hold the clew out on the windward side of the boat, as far away from the
boat as possible. This helps the spinnaker fill up so that the grinders can fly it again. If you're busy, ask another crew member to
hold out the clew.
- If we get an hourglass (twist) in the spinnaker during the hoist, pull down on the leech
(the edge opposite the pole) to help remove the twist.
Raise the Jib
- Skipper gives the command: Put up the Jib
- If the wind has gotten lighter or heavier, the crew should ask the captain if we want to switch jibs.
- Mast
- Make sure the halyard jumper, the halyard tailer, and the halyard grinder are in position and ready to go. Supervise the jumper, tailer, and grinder, and help them out if needed.
- Sails Handler
- Remove the bungee cords that are on top of the jib.
- Tell the jumper to start jumping the jib halyard.
- Halyard jumper: Jump the jib halyard.
- Halyard tailer: Wrap the halyard once around the correct winch, and tail using long, fast arm motions. When it gets too hard to pull the halyard by hand, add 2 wraps around the winch and tell the grinder to grind.
- Halyard grinder: Grind the jib halyard until the jib reaches the top.
- Halyard tailer: Tie off the halyard with a perfect cleat.
- Mast
- After the jib halyard is cleated off and the jib is trimmed, look at the luff of the jib. If there are wrinkles on the luff, tension the jib halyard until the wrinkles disappear. In general, the higher the wind, the more the jib halyard needs to be tensioned.
Spinnaker Douse: Floater/Mexican Douse
- Skipper announces Floater douse or Mexican Douse, followed by either Port or Starboard.
- Listen carefully to the full douse announcement. “Port” or “Starboard” indicates which side of the boat the spinnaker will be coming down on.
- Skipper gives the command: Prepare to Trip the Pole
- Mast
- Take command of the topping lift: Hold the topping lift in your hand and ask the cockpit to release the topping lift.
- Lower the outboard end of the pole 2'.
- Pole
- (New!) Ask the cockpit to tension the LAZY jib sheet.
- Skipper gives the command: Trip the Pole
- Pole
- Trip the pole by pulling back on the blue cord that's attached to the pole jaws (this works better than pulling down on the red cord).
- Guide the pole down to the foredeck. Slide the outboard end of the pole between the pulpit and the stanchion that's closest to the pulpit.
- Quadruple-check that the jib sheets are on top of the pole. Nat: maybe assign one of the grabbers the specific responsibility of checking the jib sheets and reporting to you?
- Mast
- Lower the outboard end of the pole to the foredeck.
- Lower the inboard end of the pole (with the gold-colored line) to about 3'. Leave enough room below the pole for the hatch to open.
- Put the topping lift in the pole jaws at the inboard end of the pole. Ask the cockpit to tension and lock the topping lift.
- Make sure the crew member handling the halyard release is in position and ready to blow the correct halyard.
(Note: If we're light on crew, the person assigned to the Mast position may also be assigned to the Halyard Release position. If so, do the tasks below labeled “Halyard release.”)
- Halyard release: Prepare the tail end of the correct spinnaker halyard to make sure the halyard will run free once you release it. Uncleat the halyard and get ready to release it. For details see the release-on-douse procedure.
- Sails Handler
- If the spinnaker collapses when the grinders are flying it bare-pole, grab the
windward clew of the spinnaker. Hold the clew out on the windward side of the boat, as far away from the
boat as possible. This helps the spinnaker fill up so that the grinders can fly it again. If you're busy, ask another crew member to
hold out the clew.
- Supervise the spinnaker grabbers: Make sure the grabbers are in position and ready to go.
- Supervise the crew member handling skirts: Remind him to lift the foot of the jib over the lifelines as we turn around the leeward
mark.
- Open the hatch.
- Spinnaker grabbers: Get into position on the port or starboard side of the deck (depending on what the skipper announced), with your back to the lifelines. One grabber should stand next to the mast. For details see the grabber procedures.
- As the boat goes around the leeward mark, the grinders bring the spinnaker around to the windward side. If we're doing a Mexican douse, the boat jibes, and the grinders bring the jib across the boat.
- Skipper gives the command: Release
- Halyard release: As soon as the spinnaker comes around to the side of the boat and is clear of the forestay, blow the spinnaker halyard.
- Spinnaker grabbers: Grab the spinnaker as quickly as possible and stuff it down the hatch. Sit up on the rail as soon as you're done with the douse.
- Skirts: Watch the foot of the jib carefully (especially on a Mexican douse). Lift the foot of the jib and place it inside the lifelines. The grinders should be able to grind in the jib without having to pause.
- Sails Handler
- Detach the spinnaker sheets from the clews as you stuff the spinnaker in the sewer: Unclip the shackles, and then attach the spinnaker sheets to the lifelines.
- Detach the spinnaker halyard: Unclip the shackle, look up to make sure the halyard is clear, and attach the halyard to the base of the mast.
- Close the hatch.
- Bring the spinnaker sheets and the afterguys forward and clip them to the pulpit.
- Ask the crew to tie Siberian hitch knots in the spinnaker sheets and the afterguys, so that the lines do not drag in the water.
- Mast
- After the hatch is closed, lower the inboard end of the pole all the way.
Spinnaker Douse: Stretch-Foot Douse
- Skipper announces Stretch-foot Douse, followed by either Port or Starboard.
- Listen carefully to the full douse announcement. “Port” or “Starboard” indicates which side of the boat the spinnaker will be coming down on.
- Sails Handler
- Supervise the spinnaker grabbers: Make sure the grabbers are in position and ready to go. Remind the grabbers to put the spinnaker OVER the lifelines and UNDER the jib sheets.
- Supervise the crew member handling skirts: Remind him to lift the foot of the jib over the lifelines as we turn around the leeward mark.
- Open the hatch.
- Mast
- Make sure the crew member handling the halyard release is in position and ready to blow the correct halyard.
(Note: If we're light on crew, the person assigned to the Mast position may also be assigned to the Halyard Release position. If so, do the tasks below labeled “Halyard release.”)
- Spinnaker grabbers: Get into position on the port or starboard side of the deck (depending on what the skipper announced). For details see the grabber procedures.
- Halyard release: Prepare the tail end of the correct spinnaker halyard to make sure the halyard will run free once you release it.
Get ready to release the halyard: Uncleat the halyard, remove one wrap from the winch, move to the windward rail, and measure out
12 feet (two arms' length) of line. For details see the release-on-douse procedure.
- Skipper gives the command: stretch-and-drop
- The grinders stretch the foot of the spinnaker along the side of the boat.
- Halyard release: Release the 12' of halyard you measured off. After that, continue to release the halyard at a quick but controlled
pace. When the grabbers have the spinnaker on the deck, release the halyard completely.
- Spinnaker grabbers: Grab the spinnaker as quickly as possible. Put the spinnaker OVER the lifelines, UNDER the jib sheets, and down the hatch. Sit up on the rail as soon as you're done with the douse.
- Skirts: Watch the foot of the jib carefully. Lift the foot of the jib and place it inside the lifelines. The grinders should be able to grind in the jib without having to pause.
- Sails Handler
- Detach the spinnaker sheets from the clews as you stuff the spinnaker in the sewer: Unclip the shackles, and then attach the spinnaker sheets to the lifelines.
- Detach the spinnaker halyard: Unclip the shackle, look up to make sure the halyard is clear, and attach the halyard to the base of the mast.
- Close the hatch.
- Mast
- Take command of the topping lift: Hold the topping lift in your hand and ask the cockpit to release the topping lift.
- Lower the outboard end of the pole to the foredeck.
- Lower the inboard end of the pole (with the gold-colored line) to the deck.
- Put the topping lift in the pole jaws at the inboard end of the pole. Ask the cockpit to tension and lock the topping lift.
- Pole
- Guide the pole down to the foredeck. Slide the outboard end of the pole between the pulpit and the stanchion that's closest to the pulpit.
- Quadruple-check that the jib sheets are on top of the pole.
- Sails Handler
- Bring the spinnaker sheets and the afterguys forward and clip them to the pulpit.
- Ask the crew to tie Siberian hitch knots in the spinnaker sheets and the afterguys, so that the lines do not drag in the water.
Tips for the Deck Crew on Spinnaker Sets
- Good communication is vital:
- Speak loudly so that the back of the boat can hear your commands (e.g., “tension the topping lift”, “made!”, etc.).
- When you ask somebody to do something, get their attention by saying their name or position before your request. For example: “Console, tension the topping lift” or “Cockpit, we need slack in the port afterguy.”
- The crew member at the mast should relay commands to/from the cockpit.
- Double-check that the jib sheets are clean every time you raise the pole and every time you lower the pole.
- During one race the lazy jib sheet appeared to be fine before the douse, but in the process of bringing the pole down, it must have slipped off the front of the pole and gotten under the pole. The foredeck crew should quadruple-check that the jib sheets are clear after the douse.
- Treat the sheets and the afterguys like halyards – every time you touch one of the lines, look back to make sure they're clean.
- When we sail downwind, we usually sail on a broad reach (see Figure 4 above). On a broad reach, we typically set the spinnaker pole high (about 6' above the deck). Occasionally we may head up to a beam reach. When flying the spinnaker on a beam reach, bring the pole down to about 2' off the deck. Lowering the height of the pole lowers the spinnaker's center of force and reduces the heel of the boat.
- When reaching, Northern Light may sail significantly faster with both a jib and a spinnaker. Be prepared to keep the jib up after the spinnaker hoist, or to raise the jib again if we lowered it at the beginning of a reaching leg. Make sure everyone who's not working gets out on the rail as far as possible, since flying both a jib and a spinnaker usually results in extreme heel.
- For additional procedures see reefing the main, executing a jib peel, and using the lightweight spinnaker sheets.
Console
The crew member working at the console controls the topping lift when the deck crew asks her to do so.
DO NOT DO ANYTHING WITH THE TOPPING LIFT UNTIL THE DECK CREW SPECIFICALLY INSTRUCTS YOU.
If you unlock the topping lift before the deck crew is ready, the spinnaker pole may fall down and injure somebody. If you lock the topping lift before the deck crew asks you to do so, you will prevent the deck crew from controlling the pole at the mast, which may impede them from completing a procedure and cost us time in a race.
Before the spinnaker hoist:
- The deck crew will raise the pole using the topping lift at the mast. When the deck crew asks you, tension and lock the topping lift.
Before the spinnaker jibe:
- When the deck crew asks you, unlock the topping lift. This lets the deck crew control the pole from mast.
During the spinnaker jibe:
- The deck crew will raise the pole back up during the jibe. When the deck crew asks you, tension and lock the topping lift.
Cowboy
The primary responsibility of the crew member assigned to the “cowboy” position is to throw the lazy spinnaker sheet on top of the spinnaker pole after we hoist the spinnaker.
The two lower corners of the spinnaker each has an afterguy and a spinnaker sheet attached to it. When we hoist the spinnaker, we attach the spinnaker pole to one of the afterguys. That afterguy is called the working afterguy, and the spinnaker sheet attached to that corner of the spinnaker (on the pole side) is called the lazy spinnaker sheet (see spinnaker figure).
When the boat jibes, we trip the pole (disconnect it from the working afterguy), move the pole to the other side of the boat, and attach the pole to the afterguy on the new side. The problem is that after the hoist, the lazy spinnaker sheet hangs down below the pole. That may prevent the pole from disconnecting from the working afterguy. In order to prevent that from happening, we must put the lazy spinnaker sheet on top of the pole. The crew member assigned to the cowboy position puts the lazy spinnaker sheet on top of the pole by flicking the spinnaker sheet with a cowboy-like gesture, hence the name of this position.
Cowboy procedure:
- After the spinnaker hoist is complete, get into position on the windward (pole) side of the boat. Stand next to the lifelines just forward of the cockpit.
- Grab the lazy spinnaker sheet (a black and red line) in your hand.
- Move your hand in a quick circular motion. This starts a wave travelling down the line toward the tip of the pole.
- If you're on the port side of the boat, the circle you draw must be clockwise in order for the line to get on top of the pole.
- If you're on the starboard side of the boat, the circle you draw must be counter-clockwise.
- Keep flicking circles in the spinnaker sheet until it finally lands on top of the outboard tip of the pole.
- Once the spinnaker sheet is on top of the pole, give the line another circular flick to wrap it around the afterguy. If you don't wrap the spinnaker sheet around the afterguy, it is likely fall off the top of the pole.
- To wrap the spinnaker sheet around the afterguy, move your hand in a quick circular motion in the same direction (clockwise or counter-clockwise) as before. If you don't go in the same direction you are likely to pull the spinnaker sheet off the top of the pole.
Tips:
- You need to do a cowboy every time we hoist the spinnaker.
- You do not usually need to do a cowboy when we jibe (the spinnaker sheet should already be on top of the pole after the jibe).
Pulpit on Jibes
The person working in the pulpit helps bring the spinnaker pole to the new windward side when the boat jibes. This person sits in the pulpit during the jibe, and (1) takes the old jib sheet off the top of the pole, (2) puts the new jib sheet (on the new windward side of the boat) on top of the pole, and (3) puts the new afterguy (on the new windward side of the boat) in the jaw at the end of the pole.
You must have a complete understanding of why we are doing these three things – i.e., why we are putting in a new afterguy, why we are dropping off the old lazy jib sheet, and why we are putting on the new lazy jib sheet. If you dont understand these things, there is a high degree of probability that something will go wrong, and you shouldnt be handling the pulpit position.
Before the race:
- Review Sailing Downwind (and especially Figure 6) to refresh your memory about what happens on a jibe. Visualize how the spinnaker pole crosses the boat and how the lazy and working afterguys switch.
Procedure for the pulpit position:
- Sit in the pulpit facing backward (i.e., facing the stern of the boat).
- Identify the "old" and the "new" sides: What side of the boat the pole is currently on, and what side of the boat is the pole crossing to?
- You will hold the lines that are brought to you with the hand that's on the "new" side: If the pole is crossing to the right side of the boat, you will hold the lines in your right hand. If the pole is crossing to the left side of the boat, you will hold the lines in your left hand.
- A crew member will bring you the new afterguy and the new jib sheet.
- Grab the new afterguy so that the back of your hand (the pinky part) is holding the part of that line going directly to the back of the boat via the toerail block. See Figure 14 below for an example. Remember pinky-to-pit: the afterguy should run from your pinky to the cockpit.
- Bend your arm (which is holding the new afterguy) at the elbow.
- Place the new jib sheet in the bend of your arm, so that the part of the jib sheet going directly to the back of the boat is on the same side of your arm as the back of your hand.
- A crew member will trip the pole, guide the outboard end of the pole down to you, and open the jaw at the end of the pole.
- Take the old jib sheet off the top of the pole and drop it down to the deck.
- Guide the pole across the boat (to the new windward side of the boat).
- Take the new jib sheet from the bend of your arm, and put it on top of the pole. Do not twist, loop, or change the direction of the new jib sheet. Hold the new jib sheet so that it does not fall off of the pole.
- Place the new afterguy in the open jaw at the end of the pole, with the back of your hand (your pinky) resting against the jaw. See Figure 14 below for an example. Remember pinky-to-pole: the pole should be next to your pinky when you put the afterguy in the jaw.
- Tell the crew member who is holding the pole to close the jaw.
- Call out Made loud enough so that everyone in the back of the boat can hear you clearly.
- TIP: Before calling out “Made,” take an extra second to double-check that the afterguy is in the correct orientation and that the jib sheet is routed correctly.
- Hold down the cockpit side of the new afterguy while the pole is being raised. This helps remove slack from the line and keeps good
tension so that the line does not loop around the outboard end of the pole.
- The crew member who is holding the pole will guide the pole back up. Watch the pole as it's being raised – if you see any problem (e.g., the afterguy loops around the end of the pole, or the new jib sheet falls off the pole), call out “HALT, RESET THE POLE,” ask the crew to bring the pole back down to the pulpit, and fix the problem.
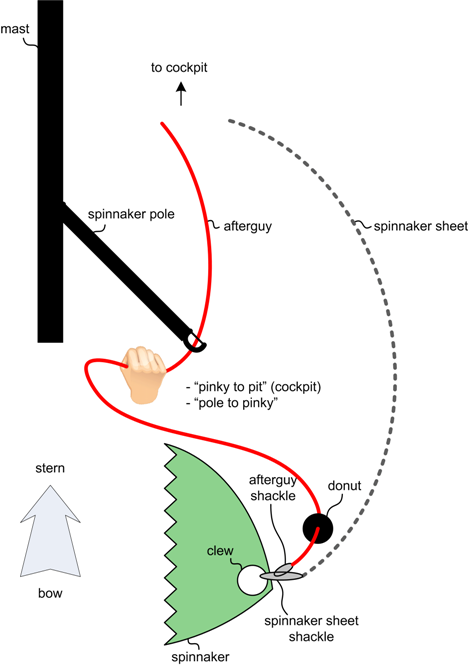
Figure 14
In this example the pole is crossing from the left side of the boat to the right side (from the point of view of the pulpit, facing the stern). Hold the new afterguy in your right hand. The afterguy should run from the back of your hand (your pinky) to the back of the boat. When you put the afterguy in the pole jaw, put your pinky next to the pole. (Note: This figure is not to scale and does not show the jib sheet.)
Tips for the pulpit position:
- Make sure there is sufficient slack in the lines when you grab them. You should be able to cross your arms while holding the lines. Insufficient slack can cause major problems.
- When you are working in the pulpit, you are the captain of the bow. Ask people to do whatever you need: "give me slack in the afterguy," "bring the pole down more," etc.
- The crew member who guides the pole down to you may not always open/close the jaw for you. In that case you need to open and close the jaw yourself. Pull the line attached to the locking pin to open the jaw, and let the line go to close the jaw.
- Don't assume the lines are handed to you correctly. Always visually follow the lines (jib sheet + afterguy) running from the back of your hand (your pinky) to the back of the boat. It's very easy to get confused with all the commotion at the pulpit, and visually confirming how the lines run is the only way to avoid mistakes.
- Take the time to make sure everything is correct before you yell “MADE.” It's a lot faster to fix a problem while you have the pole at the pulpit, rather than having to bring the pole back down after it's been raised.
Halyard Release on Douse
The primary responsibility of the crew member who handles the spinnaker release-on-douse is to bring down the spinnaker.
To bring down the spinnaker, you release the halyard that is holding up the spinnaker. At the same time that you release the halyard,
the spinnaker grabbers gather the spinnaker and stuff it through the hatch on the foredeck into
the cabin below.
Spinnaker douses are pivotal – the crew must bring down the spinnaker quickly and smoothly. If we have a problem with a douse,
we can lose a lot of time trying to fix it. For example, we may need to continue sailing downwind well past the leeward mark, instead of
turning up toward the next mark on the course. Even if we can turn and start heading toward the next mark, if the crew has to spend time
addressing a problem on the foredeck, that means the crew is not sitting on the rail, which slows the boat down significantly.
Races are often won or lost depending on how well the crew executes spinnaker douses, and
the halyard release is key to a good douse.
Most of the time we bring down the spinnaker using either a floater douse or a
Mexican douse. In these douses, the grinders bring the spinnaker around to the windward side of the boat.
As the boat turns upwind, the wind pushes the spinnaker against the jib and the mainsail, and the spinnaker grabbers slide the spinnaker
down those sails and stuff it through the hatch. Your job in a floater douse or a Mexican douse is simply to blow (release) the halyard
when the skipper gives the "release" command. Timing is critical: If you release the halyard too soon, the spinnaker will fall into the
water and/or get hung up on the rigging. If you release the halyard too late, the spinnaker will blow down the slot between the jib and
the mainsail and fall into the water. The skipper gives the "release" command, but in general your goal is to blow the halyard
as soon as the top of the spinnaker moves around the forestay.
Occasionally we bring down the spinnaker using a stretch-foot douse. In this douse, the grinders
stretch the foot of the spinnaker along the leeward (downwind) side of the boat, where the spinnaker grabbers can grab the spinnaker
and haul it on board. When we do a stretch-foot douse, your job is to do an initial release of 12 feet of halyard, and then
to continue to let out the halyard at a quick but controlled rate – the goal is to let the spinnaker come down as quickly as possible,
but not so quickly that the spinnaker grabbers can't keep up and the spinnaker falls in the water.
Before the race:
- Familiarize yourself with the two spinnaker halyards.
- Familiarize yourself with the two winches that are used for the spinnaker halyards
(see Figures 2 and 3 above).
Procedure for a floater or Mexican douse:
- As we approach the leeward mark at the end of a downind leg, listen for the command Prepare to Douse.
This is your cue to get into position and get ready to release the spinnaker halyard.
- Identify the halyard that is holding up the spinnaker.
- Look at the base of the mast: If you see the green (starboard) halyard there, that means the red (port) halyard is holding up
the spinnaker. If you see the red (port) halyard at the base of the mast, that means the starboard (green) halyard is holding up
the spinnaker.
- Get into position next to the correct winch.
- Prepare the halyard to make sure it will run free (quickly and without friction) once you release it.
- Take the tail end of the halyard out of the companionway, make sure the line is clear, and then put it back down
through the companionway. This prevents the halyard from getting stuck in the cabin below.
- Uncleat the halyard, and hold the tail end of the halyard in your hand. Get ready to blow the halyard.
- Look at the spinnaker as the grinders pull it around to the windward side of the boat.
- When the skipper gives the release command, blow the halyard.
- Remove the wraps from the winch and let the halyard go.
- Don't try to control the speed or stop the halyard on its way down – just “commit & blow.”
- Note: Occasionally the skipper will not give the “release” command. Watch the top of the spinnaker carefully,
and be prepared to release the halyard as soon as the spinnaker comes around to the side of the boat and is clear of the
forestay.
- Feed the halyard to the block at the base of the mast so that the spinnaker drops as quickly as possible (see e.g. the block for
the starboard spinnaker halyard in Figure 15 above).
- If you don't have any other jobs after the spinnaker douse, go and sit up on the windward rail as soon as possible.
Procedure for a stretch-foot douse:
- As we approach the leeward mark at the end of a downind leg, listen for the command Prepare to Douse.
This is your cue to get into position and get ready to release the spinnaker halyard.
- Identify the halyard that is holding up the spinnaker.
- Look at the base of the mast: If you see the green (starboard) halyard there, that means the red (port) halyard is holding up
the spinnaker. If you see the red (port) halyard there, that means the starboard (green) halyard is holding up the spinnaker.
- Prepare the halyard to make sure it will run free (quickly and without friction) once you release it.
- Take the tail end of the halyard out of the companionway, make sure the line is clear, and then put it back down
through the companionway. This prevents the halyard from getting stuck in the cabin below.
- Undo the cleat, and unwrap the halyard from the winch until there are only two wraps left.
- While still holding the halyard, move out to the windward (high) side of the boat.
- Take care not to let the halyard slip as you move.
- Position yourself near the toe rail and slightly in front of the mast. You should have a clear view of the
spinnaker to lee (downwind).
- Your body position is critical: You need to weigh down the windward side of the boat and also see the spinnaker clearly.
Weighing down the windward side of the boat is important because the boat heels significantly when we do a stretch-foot douse.
Seeing the spinnaker clearly is important because it lets you adjust the speed with which you release the halyard
(you don't want to release the halyard too quickly and let the spinnaker fall into the water).
- Measure out 12 feet of halyard.
- Keep the halyard secure with one hand, and measure out two arms' length of line with the other hand. Two arms' length
will will be about 12 feet of line.
- When the skipper gives the command stretch-and-drop:
- Immediately release the entire 12 feet of halyard that you measured off.
- Do this by letting go of the halyard with the hand that is closest to the winch, and moving the other hand to the
position where your first hand was.
- Continue to release the halyard at a quick but controlled pace.
- Your goal is to let the spinnaker grabbers haul in the spinnaker as quickly as possible, but you don't want the
spinnaker to come down so fast that it falls into the water.
- As the spinnaker comes down, it will have a J-shaped profile (where the grabbers are pulling the bottom end of the J).
A good guideline is to lower the spinnaker so that the bottom of the J is relatively flat (just below horizontal). If the
bottom of the J is much lower than that, the wind can flap the sail into the water.
- As soon as the spinnaker grabbers have the spinnaker on deck, release the halyard completely.
- Move from the windward side of the boat to the winch with the halyard, and take the halyard off the winch.
- If you don't have any other jobs after the spinnaker douse, go and sit up on the windward rail as soon as possible.
Spinnaker Grabbers
On downwind legs, the boat sails with a spinnaker. As we approach the leeward (downwind) mark, we douse (lower) the spinnaker,
and put it away through the foredeck hatch into the cabin below. The primary responsibility of the spinnaker grabbers is to bring down
the spinnaker quickly and cleanly during the douse.
We do one of three douses on Northern Light:
- floater douse
- Mexican douse
- stretch-foot douse
The floater douse and the Mexican douse are both windward douses. In these douses, the grinders bring the spinnaker around to the windward (upwind) side of the boat, and the wind pushes the spinnaker against the mainsail and the jib. The spinnaker grabbers then grab the spinnaker, slide it down the mainsail and the jib onto the foredeck, and stuff it down the hatch.
The stretch-foot douse is a leeward douse. In this douse, the grinders stretch the foot of the spinnaker along the leeward (downwind) side of the boat. The spinnaker grabbers then grab the spinnaker, bring it over the lifelines onto the deck, and stuff it under the jib sheet and down the hatch.
We do a floater or Mexican douse much more frequently than a stretch-foot douse, so focus on the procedure for the floater/Mexican douse first. Regardless of which douse we do, the spinnaker grabbers must bring down the spinnaker QUICKLY (so that it does not fall into the water) and CLEANLY (so that it does not interfere with the jib or any lines or other rigging on the foredeck).
Before the race:
- The foredeck boss decides where all the spinnaker grabbers are stationed. Ask the foredeck boss where you should be stationed for a floater/Mexican douse and for a stretch-foot douse.
- For a floater/Mexican douse:
- Grabber # 1 (the strongest and most experienced grabber) should be stationed adjacent to the mast, standing up and holding on to the shrouds. Grabber # 1 will be able to reach higher and start pulling down the spinnaker sooner than the grabbers on the foredeck.
- The rest of the grabbers should be stationed near the hatch on the foredeck, crouching down with their backs to the lifelines.
- For a stretch-foot douse, all grabbers should be stationed on the foredeck, crouching down and facing the lifelines.
- Locate the jib sheets so that you can identify them easily during a douse. The jib sheets are thick white lines with red markings – see Figure 10 above.
Procedure for a floater/Mexican douse:
- Listen for commands from the skipper, who will announce either a floater douse or Mexican douse, followed by either port or starboard.
- “Port” or “Starboard” indicates which side of the boat the spinnaker will come down on.
- Get into position on either the port or starboard side of the boat, depending on what the skipper announced.
- Grabber # 1 should get in position near the mast:
- Stand with your back to the mast on the port or starboard side (depending on what the skipper announced), facing out toward the lifelines. Brace one foot against the base of the mast, and grab the shrouds with one hand. Be prepared for the boat to heel as we douse the spinnaker and go around the mark, but be sure not to lean against or touch the spinnaker halyard that is being released.
- The other grabbers should get into position on the foredeck near the hatch:
- Crouch down on the foredeck with your back to the lifelines, facing the centerline of the boat.
- As we go around the mark, the grinders will bring the spinnaker around to the windward side of the boat.
- Grabber # 1: Grab the spinnaker leech as high and as early as you can, and pull the spinnaker down. You should be able to start pulling the spinnaker down before the grabbers on the foredeck.
- Grabbers on the foredeck: Grab the foot of the spinnaker as it comes in behind you, and put the spinnaker over your head and in front of you. After the spinnaker is in front of you, get up on your knees so you can reach higher to grab the spinnaker as it comes down.
- When the skipper gives the douse command, a crew member will release the spinnaker halyard, and the spinnaker will start to come down.
- As the spinnaker comes down, grab it and put it down on the deck.
- Use BIG arm-over-arm motions to bring down HUGE GRASPS of spinnaker material.
- After you've brought the spinnaker down on the deck, stuff it down the hatch.
- Immediately after you finish putting putting the spinnaker down the hatch, sit up on the windward (high) rail with your weight out as far as possible. Having your weight on the rail is critical to boat speed.
Procedure for a stretch-foot douse:
- Listen for commands from the skipper, who will announce a stretch-foot douse, followed by either port or starboard
- “Port” or “Starboard” indicates which side of the boat the spinnaker will come down on.
- Get into position on either the port or starboard side of the boat, depending on what the skipper announced.
- Kneel down on the foredeck facing out toward the lifelines, and brace your body against a stanchion or against the rail on the edge of the deck.
- Remind yourself and the other spinnaker grabbers “OVER–UNDER”: you need to bring the spinnaker OVER the lifelines and UNDER the jib sheet.
- When the skipper gives the douse command, a crew member will release the spinnaker halyard, and the spinnaker will start to come down.
- As the spinnaker starts to come down, grab it and put it down on the deck.
- Use BIG arm-over-arm motions to bring down HUGE GRASPS of spinnaker material.
- Put the spinnaker OVER THE TOP LIFELINE and down onto the deck.
- After you've brought the spinnaker down on the deck, stuff it UNDER THE JIB SHEET and INTO THE HATCH.
- Immediately after you finish putting putting the spinnaker down the hatch, sit up on the windward (high) rail with your weight out as far as possible. Having your weight on the rail is critical to boat speed.
Tips for the spinnaker grabbers:
- Do not worry about bringing the spinnaker down neatly – just bring it down as quickly as possible and stuff it into the hatch. (After you put the spinnaker down the hatch, Nancie or another crew member working in the sewer will untangle the spinnaker and pack it back neatly into the turtle bag, so it is ready to use on the next downwind leg.)
- If you have any questions or problems with the spinnaker douse, talk to the foredeck boss. You may also want to talk to the crew member who is responsible for lowering the spinnaker halyard if you feel the spinnaker is coming down too quickly or too slowly.
Lightweight Spinnaker Sheets
When the wind is light, the combined weight of the afterguys and the spinnaker sheets can pull down the spinnaker clews and prevent the spinnaker from filling up properly. In this situation, we take off the afterguys and the regular spinnaker sheets, and put on lightweight spinnaker sheets instead.
When we use the ligthweight spinnaker sheets, there is only one line on each side of the boat: The leeward line is used as a spinnaker sheet, and the windward line is used as an afterguy. Thus we refer to the lightweight sheets as “singles.” In contrast, the regular sheets and afterguys are called “doubles,” since we use two sheets and two afterguys at the same time. The procedure we use for a spinnaker jibe with the lightweight spinnaker sheets is different than our normal jibing procedure because there is only one line on each side of the boat.
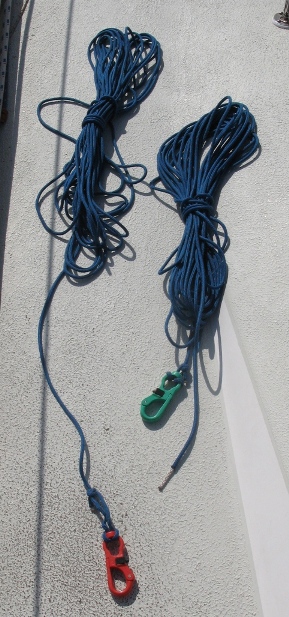
Figure 16: Lightweight Spinnaker Sheets
Putting on the Lightweight Spinnaker Sheets
If we decide to use the lightweight sheets before we hoist the spinnaker, we can simply attach both lightweight sheets to the spinnaker clews while the spinnaker is still in the turtle.
Frequently, however, we make the call to use the lightweight sheets while we are flying the spinnaker. To put on the lightweight sheets in this situation, we first put on one a lightweight sheet on the leeward side of the boat. After we jibe, we put on the other lightweight sheet on the new leeward side of the boat.
Procedure for putting on a lightweight spinnaker sheet while the spinnaker is flying:
- Take the lightweight spinnaker sheets out of the starboard lazarette at the stern.
- Rig one of the lightweight spinnaker sheets through the small turning block attached to the rail near the stern on the leeward side of the boat.
- Bring the shackle of the lightweight spinnaker sheet to the foredeck. Make sure the line runs outside of the lifelines.
- Bring in the clew of the spinnaker by pulling in the afterguy on the leeward side of the boat.
- Attach the shackle of the lightweight spinnaker sheet directly to the cringle on the spinnaker.
- Clip the lightweight sheet shackle to the cringle on top of the regular sheet shackle.
- Visually check that the lightweight sheet is on top of the regular sheet and the afterguy, and that the lightweight sheet runs to the block at the back of the boat cleanly (without any wraps and outside of everything else).
- Unclip the shackle of the regular spinnaker sheet from the spinnaker, and clip it to one of the lifelines.
- Say “MADE” so the grinders know they can start flying the spinnaker with the new lightweight sheet.
Jibing with the Lightweight Spinnaker Sheets (End-For-End Jibe)
The procedure for jibing with the lightweight spinnaker sheets is different than the regular jibing procedure, since there is no lazy afterguy to put in the pole jaws. To jibe with the lightweight spinnaker sheets, we do an end-for-end jibe. In an end-for-end jibe, we rotate the pole so that the inboard (mast) end of the pole becomes the new outboard end, and the old outboard end becomes the new inboard (mast) end.
Procedure for a spinnaker jibe with the lightweight spinnaker sheets:
- Ask the cockpit to release the foreguy.
- Trip both ends of the spinnaker pole.
- At the outboard end, the afterguy should come out of the pole jaws.
- At the inboard end, the pole jaws should detach from the ring on the mast.
- Ideally you should trip both ends of the pole at the same time; in practice you'll probably trip the inboard (mast) end of the pole first and then the outboard end.
- Drop the old jib sheet off the old outboard end of the pole.
- Put the new jib sheet on top of the new outboard end of the pole.
- Tip: Put the new jib sheet over your shoulder before the jibe, so it's easy to grab and put on top of the pole.
- Attach the jaws of the new outboard end of the pole to the lightweight spinnaker sheet on the leeward side of the boat.
- Attach the jaws of the new inboard end of the pole to the ring on the mast.
- Tip: Push the end of the pole to the mast (this works better than pulling the pole toward the mast).
- Say “MADE” so the grinders know they can start adjusting the pole.
- After the jibe, if the leeward clew of the spinnaker is still attached to a regular (heavy) sheet, put on the second lightweight spinnaker sheet using the procedure described above.
If the wind picks up and we decide to switch back to the regular sheets and afterguys, use the same procedure we used to put on the lightweight sheets: Put on a regular sheet and afterguy on the leeward side of the boat first, then put on the other regular sheet and afterguy after a jibe.
|