Home
Carpool
Contact Info
Debrief
Fleet Info
Links
Logistics
Marks & Courses
Photos & Videos
Procedures
Results
Rules
Sitemap
Home
Carpool
Contact Info
Debrief
Fleet Info
Links
Logistics
Marks & Courses
Photos & Videos
Procedures
Results
Rules
Sitemap
|
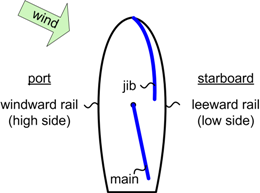
ProceduresSailing BasicsThis page describes the basics of sailing. Much of the information on this page applies to sailboats generally, but some of the information – particularly the description of how the sails are rigged – is specific to the type of boat that Northern Light is, a Santana 35. If you're not familiar with some of the terms on this page, look them up on the Glossary page. SailsWhen sailing upwind ("to weather"), the boat uses two sails: a main sail and a jib. Wind flows on both sides of the sails, which makes the sails act like airplane wings, pulling the boat forward and laterally. As the boat moves, water flows around the keel, which makes the keel act like an airplane wing as well, pulling the boat forward and laterally. The lateral force generated by the keel is in the opposite direction of the lateral force generated by the sails. The lateral force from the keel thus cancels out the lateral force from the sails; that leaves only the forward force, which pulls the boat forward (upwind). For a visualization of the “lift” forces that enable a sailboat to sail into the wind, see The Physics of Sailing, a 10-minute video from KQED. When sailing downwind ("to lee"), the boat also uses two sails: a main sail and a spinnaker. In this direction, the sails act like parachutes rather than airplane wings – they fill with wind coming from behind the boat and drag the boat forward (downwind). The spinnaker is difficult to control because it has two free corners (corners that are not attached to something solid like the mast, boom, or forestay). Thus, if there are not enough crew members to help fly the spinnaker, or if the wind is very strong, the boat may sail downwind using a jib instead of a spinnaker. When sailing perpendicular to the wind ("reaching"), the boat uses a main sail, and it may use either a jib or a spinnaker. In some situations the boat may use all three sails – a main sail, a jib, and a spinnaker. In this direction the sails act like airplane wings, and it is important for the crew to trim them (adjust their angle relative to the direction of the wind) so that the wind flows smoothly on both sides of each sail. Position of SailsThe sails are always on the leeward (downwind) side of the boat, since that's the direction in which the wind pushes them. Thus:
Figure 1 below shows the position of the sails on a port tack and a starboard tack:
Figure 1
For optimal speed, sails need to be trimmed properly. To trim a sail means to adjust the angle of the sail relative to the direction of the wind so that air flows smoothly on both sides of the sail. When sailing to weather, the sails are brought in close to the centerline of the boat. As the boat turns and sails farther away from the direction of the wind, the sails are let out farther from the boat. The points-of-sail diagram below shows how the angle of the sails varies with the direction of the boat relative to the wind: 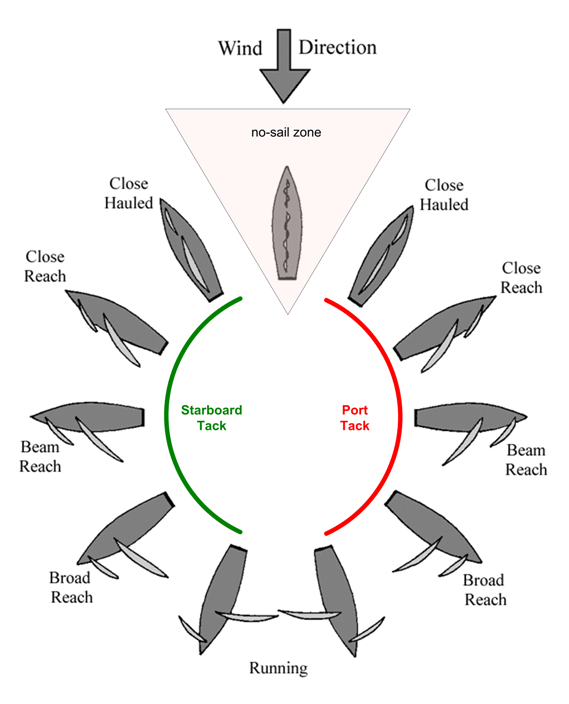
Figure 2
Sailing Upwind ("To Weather")Boats cant sail directly into the wind, but they can sail in an upwind direction by following a zig-zag course. 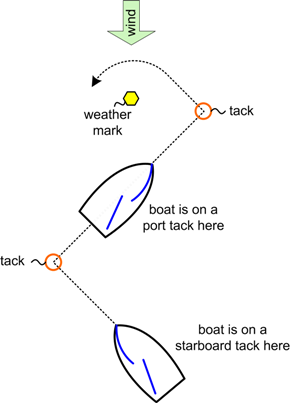
Figure 3
Each time the boat changes direction at one of the corners of the zig-zag course, the boat is said to tack. Each time the boat tacks:
Its important to complete each tack as fast as possible: The boat has no power and loses speed during a tack, and it takes a long time for an 8,000 lb. boat to build its momentum back up. The faster the crew brings in the jib, the faster the boat powers up and the less speed it loses. Figure 4 below illustrates a tack in which the boat changes from a starboard tack to a port tack:
Figure 4
Sailing Downwind ("To Lee")When sailing downwind, boats typically use a spinnaker instead of a jib. The spinnaker acts like a parachute – it fills with wind and provides extra downwind speed. The spinnaker is raised immediately after rounding the weather mark, and lowered before (or while) rounding the leeward mark. Boats can sail directly downwind, but for a number of reasons (currents, other boats, etc.), a boat may want to sail a zig-zag course: 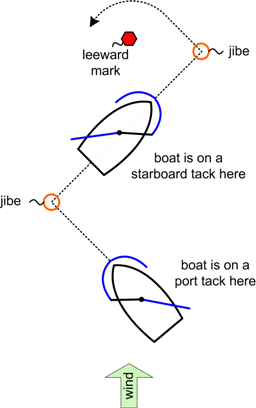
Figure 5
Each time the boat changes direction at one of the corners of the zig-zag course, the boat is said to jibe. Note the difference in terms:
Each time the boat jibes:
Figure 6 below illustrates a jibe in which the boat changes from a port tack to a starboard tack:
Figure 6
Working with the MainUsing the MainThe main sail is used throughout the entire race. The main sail is only raised once (when we leave the dock), and lowered once (when we return to the dock). Controlling the MainThe main sail is relatively easy to control. The sail is trimmed by moving the traveller windward or leeward, and by bringing the main sheet in or letting it out. The traveller and the main sheet are attached to the boom; when those lines are brought in or let out, they rotate the boom around the mast, and thus change the angle of the main sail. The proper trim for the main sail depends on the boat's point of sail (see Figure 2). When the boat is sailing close-hauled, the main sail is brought in close to the centerline of the boat. As the boat bears away from the wind, the main sail is eased out farther from the boat. When the boat is on a broad reach or a run, the main sheet is let out all the way, and a crew member usually helps push the boom out so that the main sail is as far away from the boat as possible (nearly perpendicular to the boat). What makes the main sail challenging is that it can be shaped in many different ways, and its shape significantly affects the speed of the boat. Here are some of the controls that can be used to shape the main sail:
The crew member responsible for the main, called the mainsheet trimmer, looks at telltales (small pieces of tape attached to various places on the main sail) to see how the wind is flowing around the sail, and constantly adjusts the controls listed above so as to shape the sail for optimal wind flow and boat speed. Attaching the MainThe main sail is attached as follows:
If the wind is very strong, the skipper may decide to reef the main. Reefing lowers the main sail by about a foot; this reduces the sail area exposed to the wind and diminishes the power generated by the sail. As illustrated in Figure 7, the main is reefed by lowering the halyard, attaching a cringle to a hook on the boom, and pulling a reefing line to draw the new clew toward the stern. The reefing line is tensioned with a winch and held in place by a clamp on the boom. The extra sail material along the foot of the main is held in place by reefing bungies that wrap around the boom. 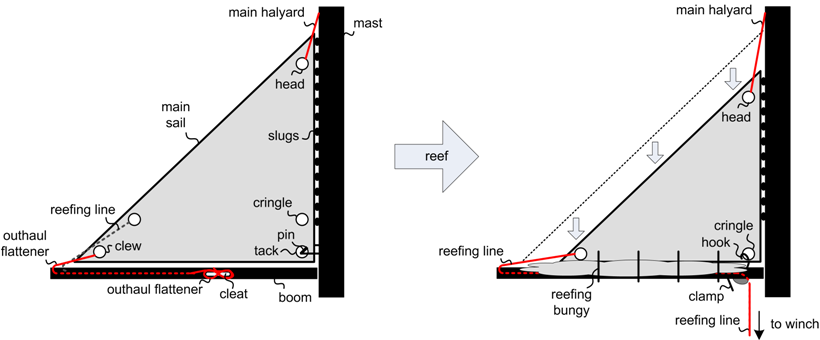
Figure 7
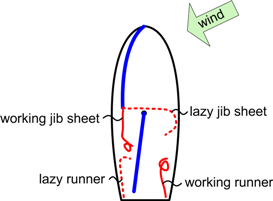
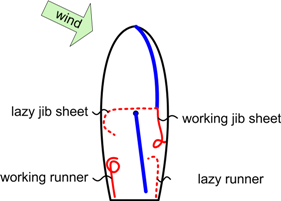
Working with a JibUsing the JibThe jib is typically used on all legs in a race except for leeward (downwind) legs. The jib is lowered at the beginning of leeward legs, shortly after rounding the weather mark and hoisting the spinnaker. The jib is hoisted again at the end of leeward legs, shortly before the spinnaker is doused and the boat rounds the leeward mark. Controlling the JibThe jib is trimmed by jib sheets, which are attached to the jib clew. There are two jib sheets – one on the port side and one on the starboard side (see Figure 8 below). The jib sheet on the leeward (downwind) side of the boat is the working (active) jib sheet; this is the jib sheet used to trim the jib. The jib sheet on the windward side of the boat is the lazy jib sheet; this jib sheet is not active. The grinders in the cockpit trim the jib by pulling the working jib sheet in or letting it out. The proper trim for the jib depends on the boat's point of sail (see Figure 2). When the boat is sailing close-hauled, the grinders pull the jib sheet in; this brings the jib close to the centerline of the boat. As the boat bears away from the wind, the grinders ease the jib sheet out, which lets the jib out farther from the boat. The grinders use a winch to bring in and let out the jib sheet, as the line is under too much stress to control by hand. When the boat tacks, the grinders release the working jib sheet, and the jib crosses the boat to the new leeward side (see Figure 4). At this point, the jib sheets "switch:" The old lazy jib sheet becomes the new working jib sheet, and vice versa (see Figure 4). The new working jib sheet pulls the jib across the boat to the new leeward side. Its important to complete each tack as fast as possible: The boat has no power and loses speed during a tack, and it takes a long time for an 8,000 lb. boat to build its momentum back up. The faster the crew brings in the jib on the new leeward side, the faster the boat powers up and the less speed it loses. Two things typically hold up a tack:
A tack may also be held up if the jib sheets are not routed properly. The jib sheets must always run on top of the spinnaker pole and in front of the topping lift (see Figure 10 below). If the jib sheets are not routed this way, the spinnaker pole or the topping lift will block the jib and prevent it from moving across the boat. Problems typically occur after the boat rounds the leeward mark – for example, the jib sheets may slip under the spinnaker pole when the pole is lowered, or the jib sheets may get stuck in the spinnaker after the spinnaker is doused (lowered). If we try to tack and something holds up the tack, we will usually tack back to our original direction so that we can keep moving while the crew figures out and solve whatever problem is preventing us from tacking. Attaching the JibThe jib is attached as follows:
When the jib is not in use (on leeward legs), the foredeck crew lowers the jib and straps it down to the foredeck with bungee cords. The crew typically prepares the jib for its next hoist by routing the luff through the pre-feed and raising the head a foot or so up the luff track, as shown in Figure 8: 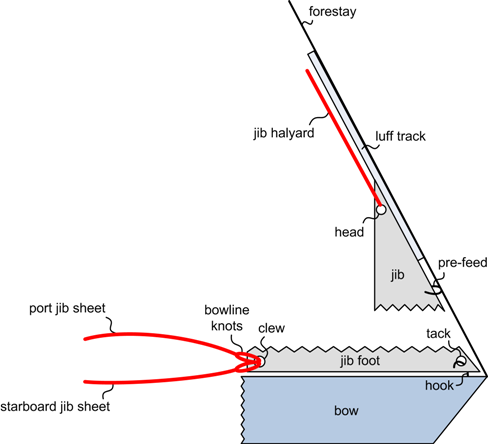
Figure 8
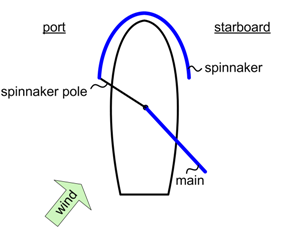
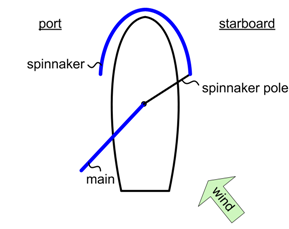
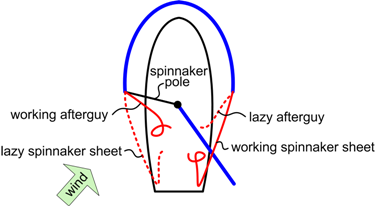
Working with a SpinnakerUsing the SpinnakerThe spinnaker is typically used on leeward (downwind) legs. The spinnaker is hoisted (raised) at the beginning of leeward legs, shortly after rounding the weather mark. The spinnaker is doused (lowered) at the end of leeward legs, shortly before (or while) rounding the leeward mark. The spinnaker is the most difficult sail to control, because it has two free corners. If conditions are particularly difficult, or if there are not enough crew members, we may forego the spinnaker and sail downwind with a jib instead. Controlling the SpinnakerThe spinnaker is an important sail because it serves as the primary horsepower of the boat on downwind legs. The spinnaker is also the hardest sail to control: Because it has two free corners, it requires a pole and 4 lines to hold in position. The lines are described below and shown in Figure 9:
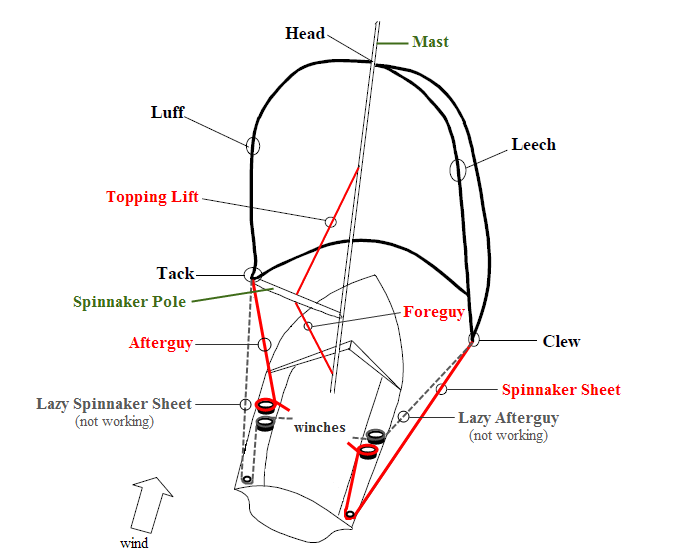
Figure 9
Spinnaker Jibe [TODO/START]
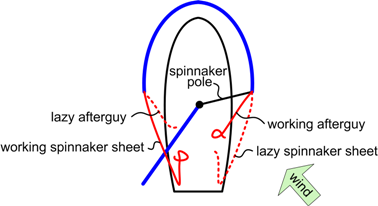
As you can see in Figure 9, the lower corners of the spinnaker (the tack and the clew) each has an afterguy and a spinnaker sheet attached to it. Only one line is active at a time – the other line is lazy (not working). The lazy lines become active (and vice versa) when the boat jibes. Thus, in Figure 9:
When the boat in Figure 9 jibes, the wind crosses over to the starboard side. When this happens, the lazy lines become active, and the active lines become lazy. After the jibe:
For a bird's eye view of what happens during a jibe, see Figure 6. Spinnaker Douse [TODO]
Attaching the Spinnaker[TODO]
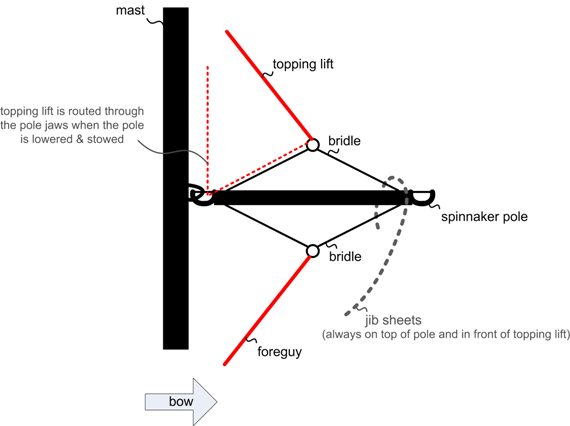
Figure 10
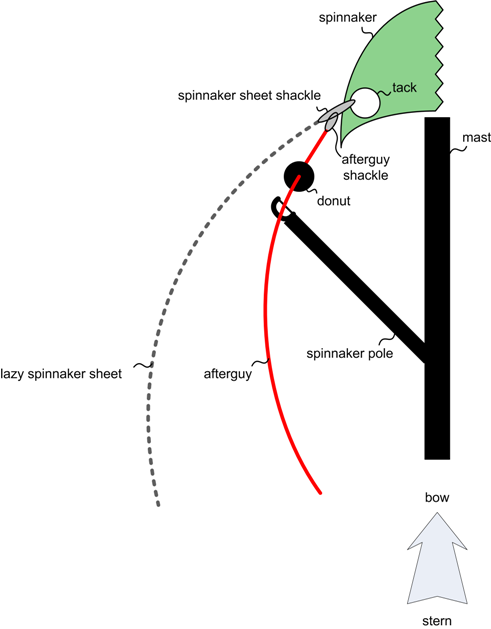
Figure 11
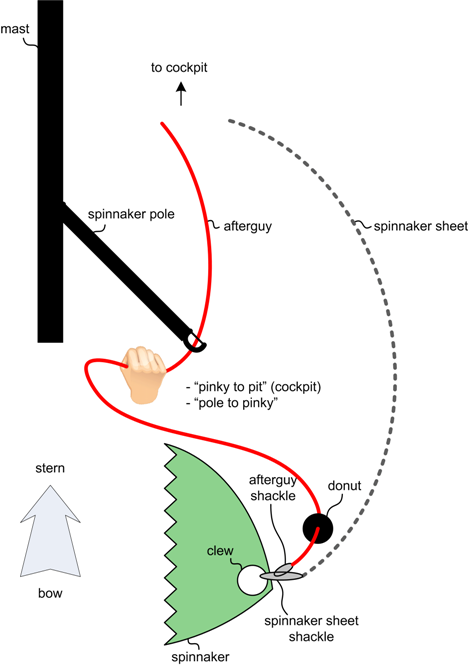
Figure 12
Packing the SpinnakerAt the end of a downwind leg, the spinnaker is doused (lowered), and stuffed through the hatch on the deck into the sewer below. A crew member then packs the spinnaker back into a turtle (storage bag). The spinnaker needs to be packed carefully, so that when it is hoisted on the next downwind leg, it comes out of the turtle without any twists. Think of it like a parachute – when you pull the ripcord, you want the chute to come out of the bag cleanly and to fill up with wind as soon as possible. When the spinnaker is doused and stuffed through the hatch, it usually becomes twisted and contorted in all sorts of ways. The crew member who is packing the spinnaker needs to untangle these twists, and also to orient the spinnaker properly, with the head at the 12:00 o'clock position and the clews at the 4:00 o'clock and 8:00 o'clock positions (looking at the top of the turtle). The spinnaker needs to be oriented properly so that the foredeck crew can attach the correct lines to each corner (halyard → head; port afterguy and spinnaker sheet → port clew; starboard afterguy and sheet → starboard clew). To straighten out the twists and make sure the spinnaker is packed in the correct orientation, the crew member who is packing the spinnaker uses color-coding on the edges of the spinnaker. This color-coding is shown in Figures 13 and 14, and described below: 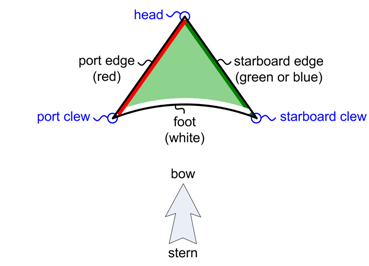
Figure 13: Spinnaker Edges
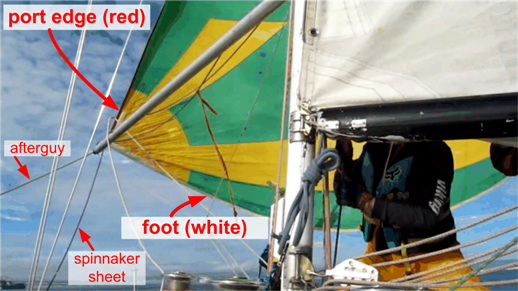
Figure 14: Spinnaker Edges
The edges of the spinnaker are colored as follows:
Thus, you can always tell which corner of the spinnaker is which by the color of the edges at that corner:
Working with LinesSee the lines section of the glossary for a list of the different lines on the boat and the things you can do to a line. See the knots section below for instructions on how to tie some frequently-used knots. Working with WinchesWinches on Northern Light
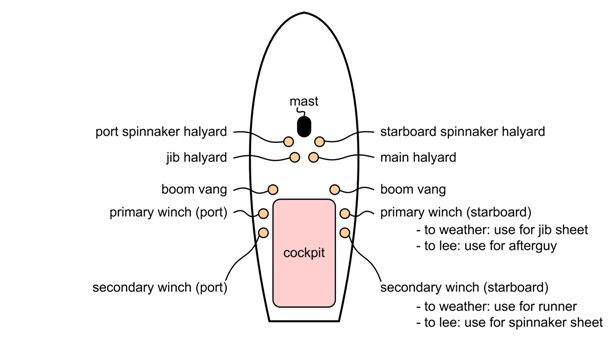
Figure 15
How to Use the Winches
Tips:
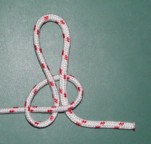
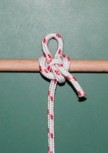
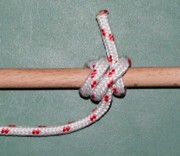
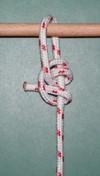
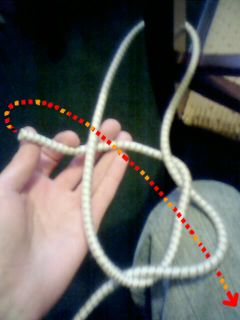
KnotsKnots are key to sailing and racing well. It is crucial to be able to tie the correct knot in each situation. At a minimum, crew members should know how to tie the following knots:
The table below has links to instructions for how to tie these knots, as well as a number of other useful knots. The important knots are highlighted with a colored background. Please practice these knots so that you can tie them quickly when you need to. Rod has a few lengths of practice rope on the boat that you can borrow if you'd like to practice at home. You can also buy your own practice rope at stores like REI and West Marine – a good size for practicing knots is about 6 feet of rope with a 7 millimeter diameter. For more information, check out John's favorite knot web sites:
|